
Licensed Application Reporting with Elasticsearch and Kibana
This guide details how to take an existing Elasticsearch and Kibana setup and import the Elasticsearch Licensed Applications report for use with the Acrobat DC for Remoting, Microsoft Office for Remoting, Microsoft Project for Remoting, Microsoft Visio for Remoting, or Nuance PDF for Remoting templates found with the License Compliance category. These templates can easily be adapted for use with other licensed applications.
The following steps will be performed:
- Step 1: Enable Elasticsearch remote requests
- Step 2: Enable Elasticsearch API key authentication
- Step 3: Define the deviceTRUST Licensed Applications mappings
- Step 4: Import the deviceTRUST Licensed Applications saved objects
- Step 5: Configure deviceTRUST to forward data to Elasticsearch
- Step 6: Viewing the Licensed Applications dashboard within Kibana
Step 1: Enable Elasticsearch remote requests
An out of the box instance exposes the Kibana user interface to remote browsers, however the Elasticsearch instance runs in a developer mode and is only accessible locally via the loopback address http://127.0.0.1:9200. For deviceTRUST to send data to Elasticsearch, the instance must respond to external web requests to a URL such as http://servername:9200. This remote access can be enabled by changing the network.host configuration value within elasticsearch.yml, however for an out of the box installation this also changes the Elasticsearch instance from Development Mode to Production Mode, and unless an SSL certificate is associated with the instance, it will automatically shut down during startup.
The detail of enabling SSL requests is out of the scope of this guide, however once enabled the remote URL https://servername:9200 can be entered within a web browser and should respond with various meta-data about the instance. This URL should be remembered as it will need to be entered into the deviceTRUST Console later.
Step 2: Enable Elasticsearch API key authentication
The deviceTRUST Web Request task can authenticate with Elasticsearch using an API key. API key authentication can be enabled by setting the xpack.security.authc.api_key.enabled configuration value to true within elasticsearch.yml.
To generate an API key, issue the following web request. This can be achieved easily by navigating to Management -> Dev Tools.
PUT /_security/api_key
{
  "name": "deviceTRUST API key"
}
This will respond with the new API key, such as the one shown below:
{
  "id" : "KqZaf28B7u0ZkoreTokR",
  "name" : "deviceTRUST API key",
  "api_key" : "Sw_k77G1SJ67lS9i6U_ggg"
}
To compute the authentication header for this request, the id and api_key values must be joined with a : and their Utf8 byte representation must be Base64 encoded and then prefixed with the text ‘ApiKey ‘. This can be achieved by modifying the following PowerShell snippet with the id and api_key returned from the response above:
$Id = "KqZaf28B7u0ZkoreTokR"
$ApiKey = "Sw_k77G1SJ67lS9i6U_ggg"
$Bytes = [System.Text.Encoding]::Utf8.GetBytes("$($Id):$($ApiKey)")
"ApiKey " + [Convert]::ToBase64String($Bytes)
The outputted text ApiKey <Base64 Encoded> should be remembered as it will need to be entered into the deviceTRUST Console later.
Step 3: Define the deviceTRUST Licensed Applications mappings
Before sending any data from deviceTRUST to Elasticsearch, it is important to import the mappings, which inform Elasticsearch how to store and index the documents that deviceTRUST will send.
Within Kibana, navigate to Management -> Stack Management and then click on Data -> Index Management. On the Index Templates tab, click on the button Create a template.
- On the Logistics page:
- Set Name to devicetrust-licensing
- Set Index patterns to devicetrust_licensing_*
- Click Next.
- On the Component templates page, click Next.
- On the Index settings page, click Next.
- On the Mappings page:
- Click the Load JSON link and copy and paste the content of the file
elasticsearch-licensed-applications-mappings.txtcontained within thedtreporting-x.x.x.x.zipfile of the media. Click Load and overwrite. - Click Next.
- Click the Load JSON link and copy and paste the content of the file
- On the Aliases page, click Next.
- On the Review template page, click Create template.
Step 4: Import the deviceTRUST Licensed Applications saved objects
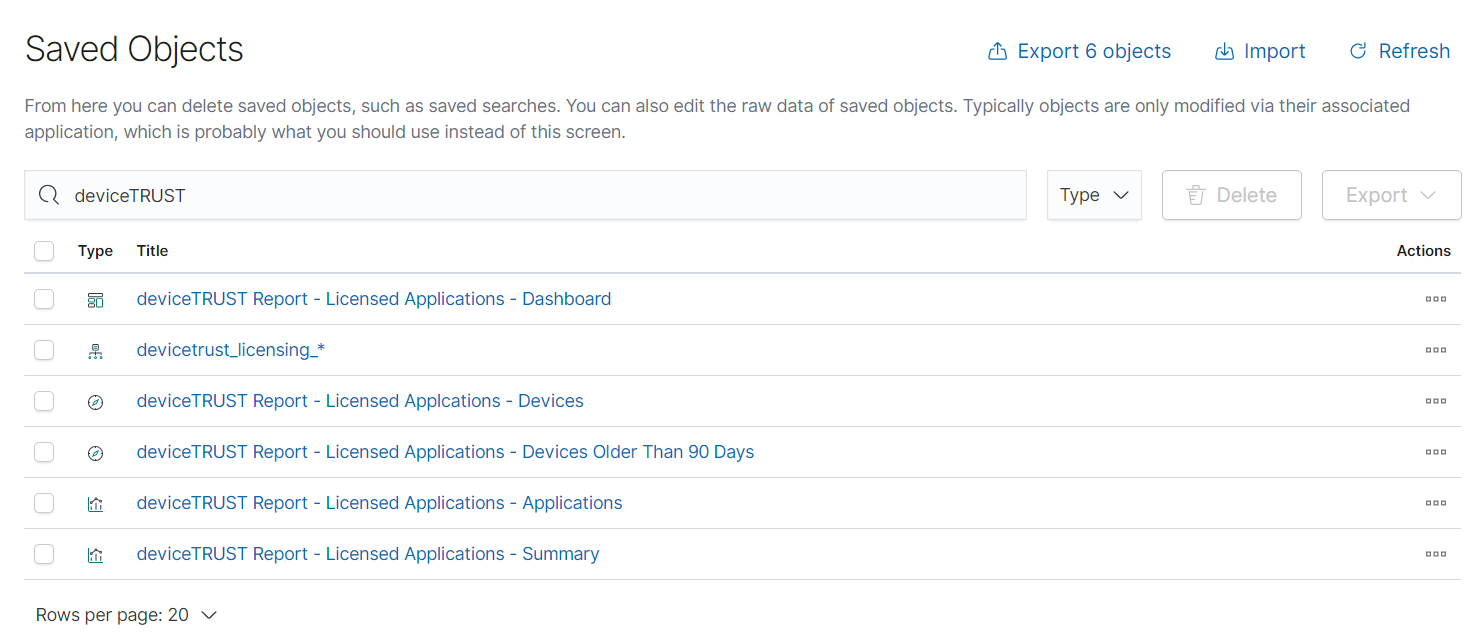
The deviceTRUST Licensed Applications saved objects contains searches, visualizations and a dashboard displaying the status of the licensed applications. Although the deviceTRUST Console includes templates for commonly licensed Microsoft applications, these saved objects can be used to manage any licensed applications.
Within Kibana, navigate to Management -> Stack Management and then click on Kibana -> Saved Objects. Click the link Import and then import the file elasticsearch-licensed-applications-saved-objects.ndjson.
Step 5: Configure deviceTRUST to forward data to Elasticsearch
With Elasticsearch configured, we can now forward information about the licensed applications using the deviceTRUST Web Request task.
Within the deviceTRUST Console, click on the Sharing button in the top right corner:
- Select one of the License Compliance templates. This guide will use Microsoft Office for Remoting.
- Click Import Template and then OK.
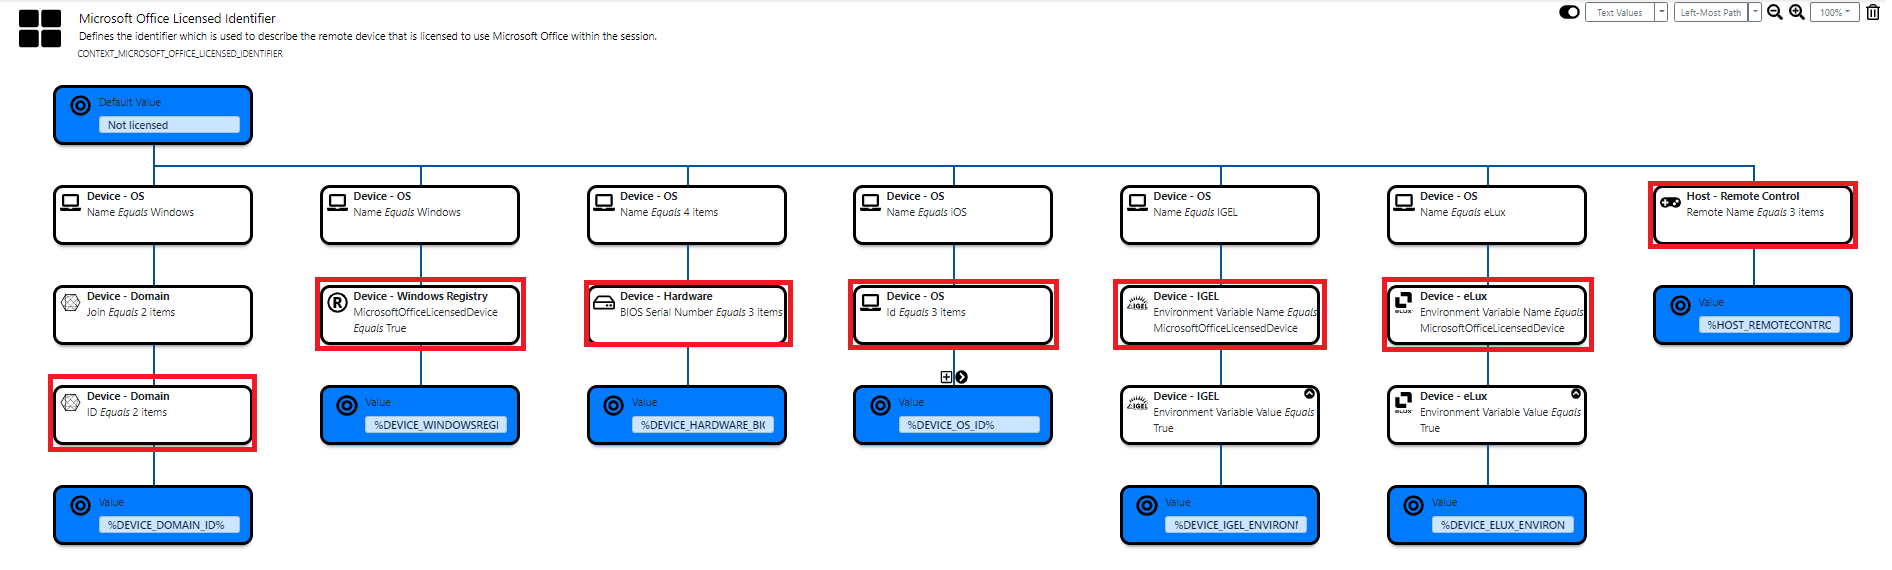
Click on the Microsoft Office Licensed Identifier context from within the Context tab. This context identifies the devices that are licensed to use the licensed application, in this case Microsoft Office. Devices can be identified by Domain Id, Registry, their BIOS Serial Number, OS Id, environment variable or the Remote Name as seen by the deviceTRUST Host. Edit any of these conditions highlighted below within the context to identify your licensed devices.
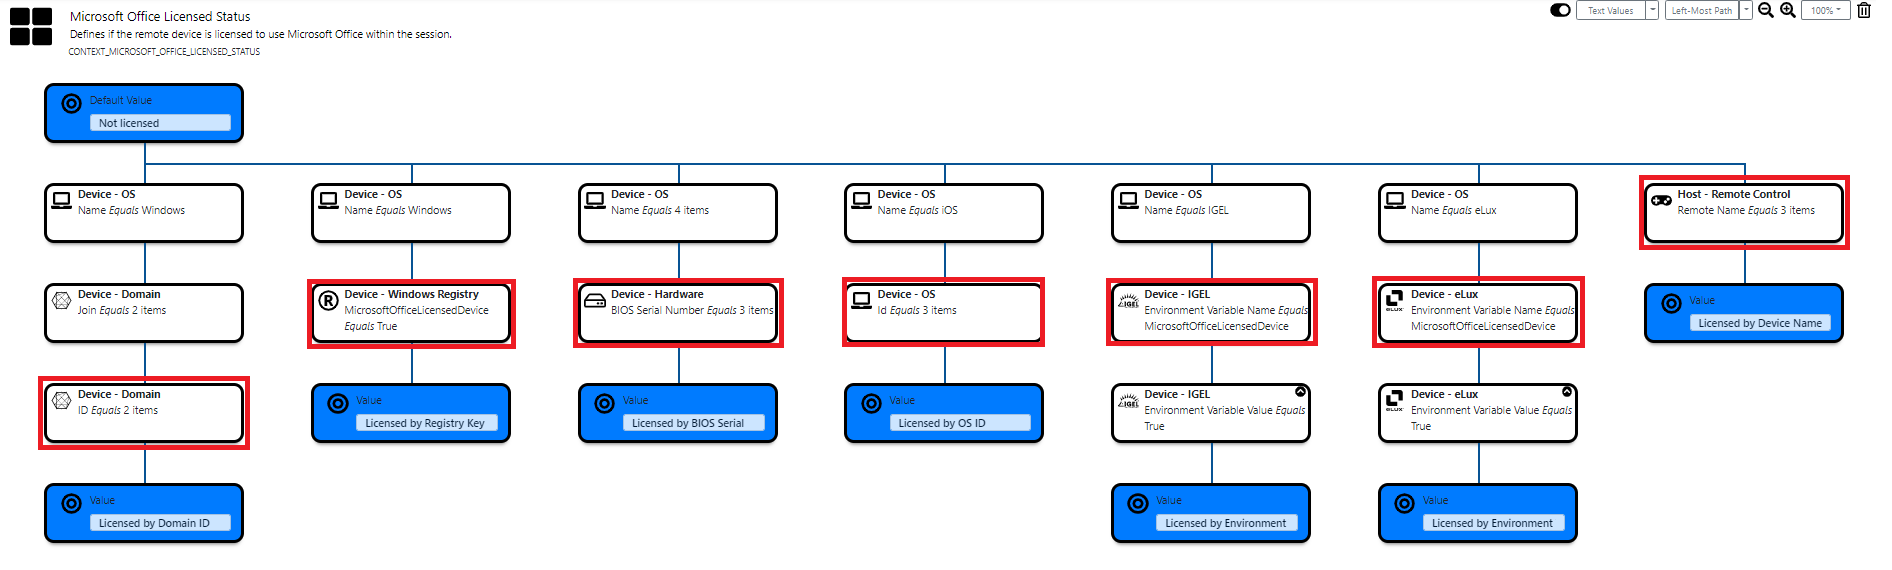
Click on the Microsoft Office Licensed Status context from within the Context tab. This context defines the licensed state of the devices. Devices can be identified by Domain Id, Registry, their BIOS Serial Number, OS Id, environment variable or the Remote Name as seen by the deviceTRUST Host. Apply the same changes that were made in the previous step within the context to define the licensed state of your devices.
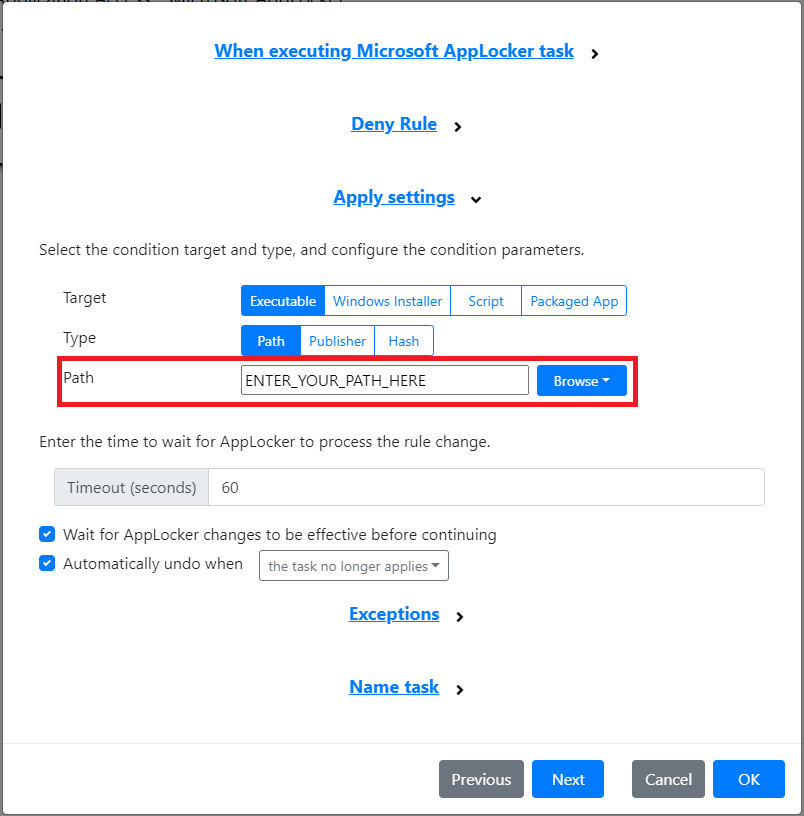
Next click on the Actions tab. Three actions were imported, two which manage the availability of the licensed applications using either FSLogix App Masking or Microsoft AppLocker, and one which reports the licensing status. Click on the action that you will use to manage the availability of the licensed application and toggle the enabled state within the action header. This guide will use Microsoft Office Licensed Device - Conditional Application Access - Microsoft AppLocker. Click on the Microsoft AppLocker task and configure the path to Microsoft Office.
Click on the Microsoft Office Licensed Device - Conditional Application Access - Reporting and edit the Web Request task highlighted below to configure Elasticsearch.
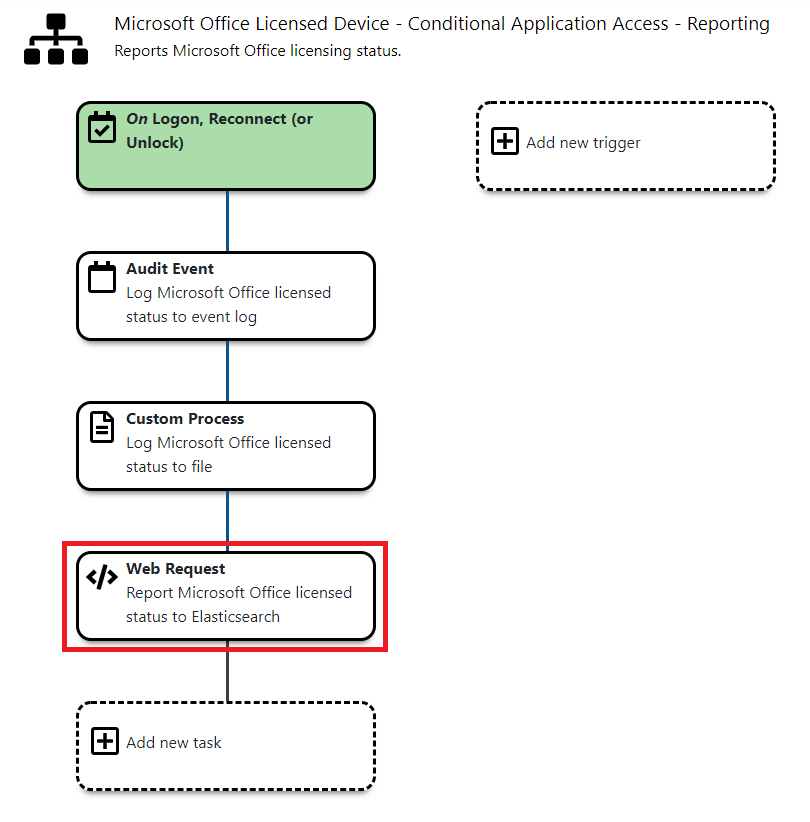
Edit the Web Request task and update the URL protocol, server name and port for your Elasticsearch server, and add an Authorization header set to the ApiKey <Base64 Encoded> value that you calculated earlier.

With the policy saved, the licensing status of any remote device which logs onto the host will be forwarded to Elasticsearch. The success of the web requests can be seen by looking for the events 391 - Web Request Succeeded or 392 - Web Request Failed within the Microsoft Event Viewer.
Step 6: Viewing the Licensed Applications dashboard within Kibana
Within Kibana, click on the Dashboard tab and then click on deviceTRUST Report - Licensed Applications - Dashboard.
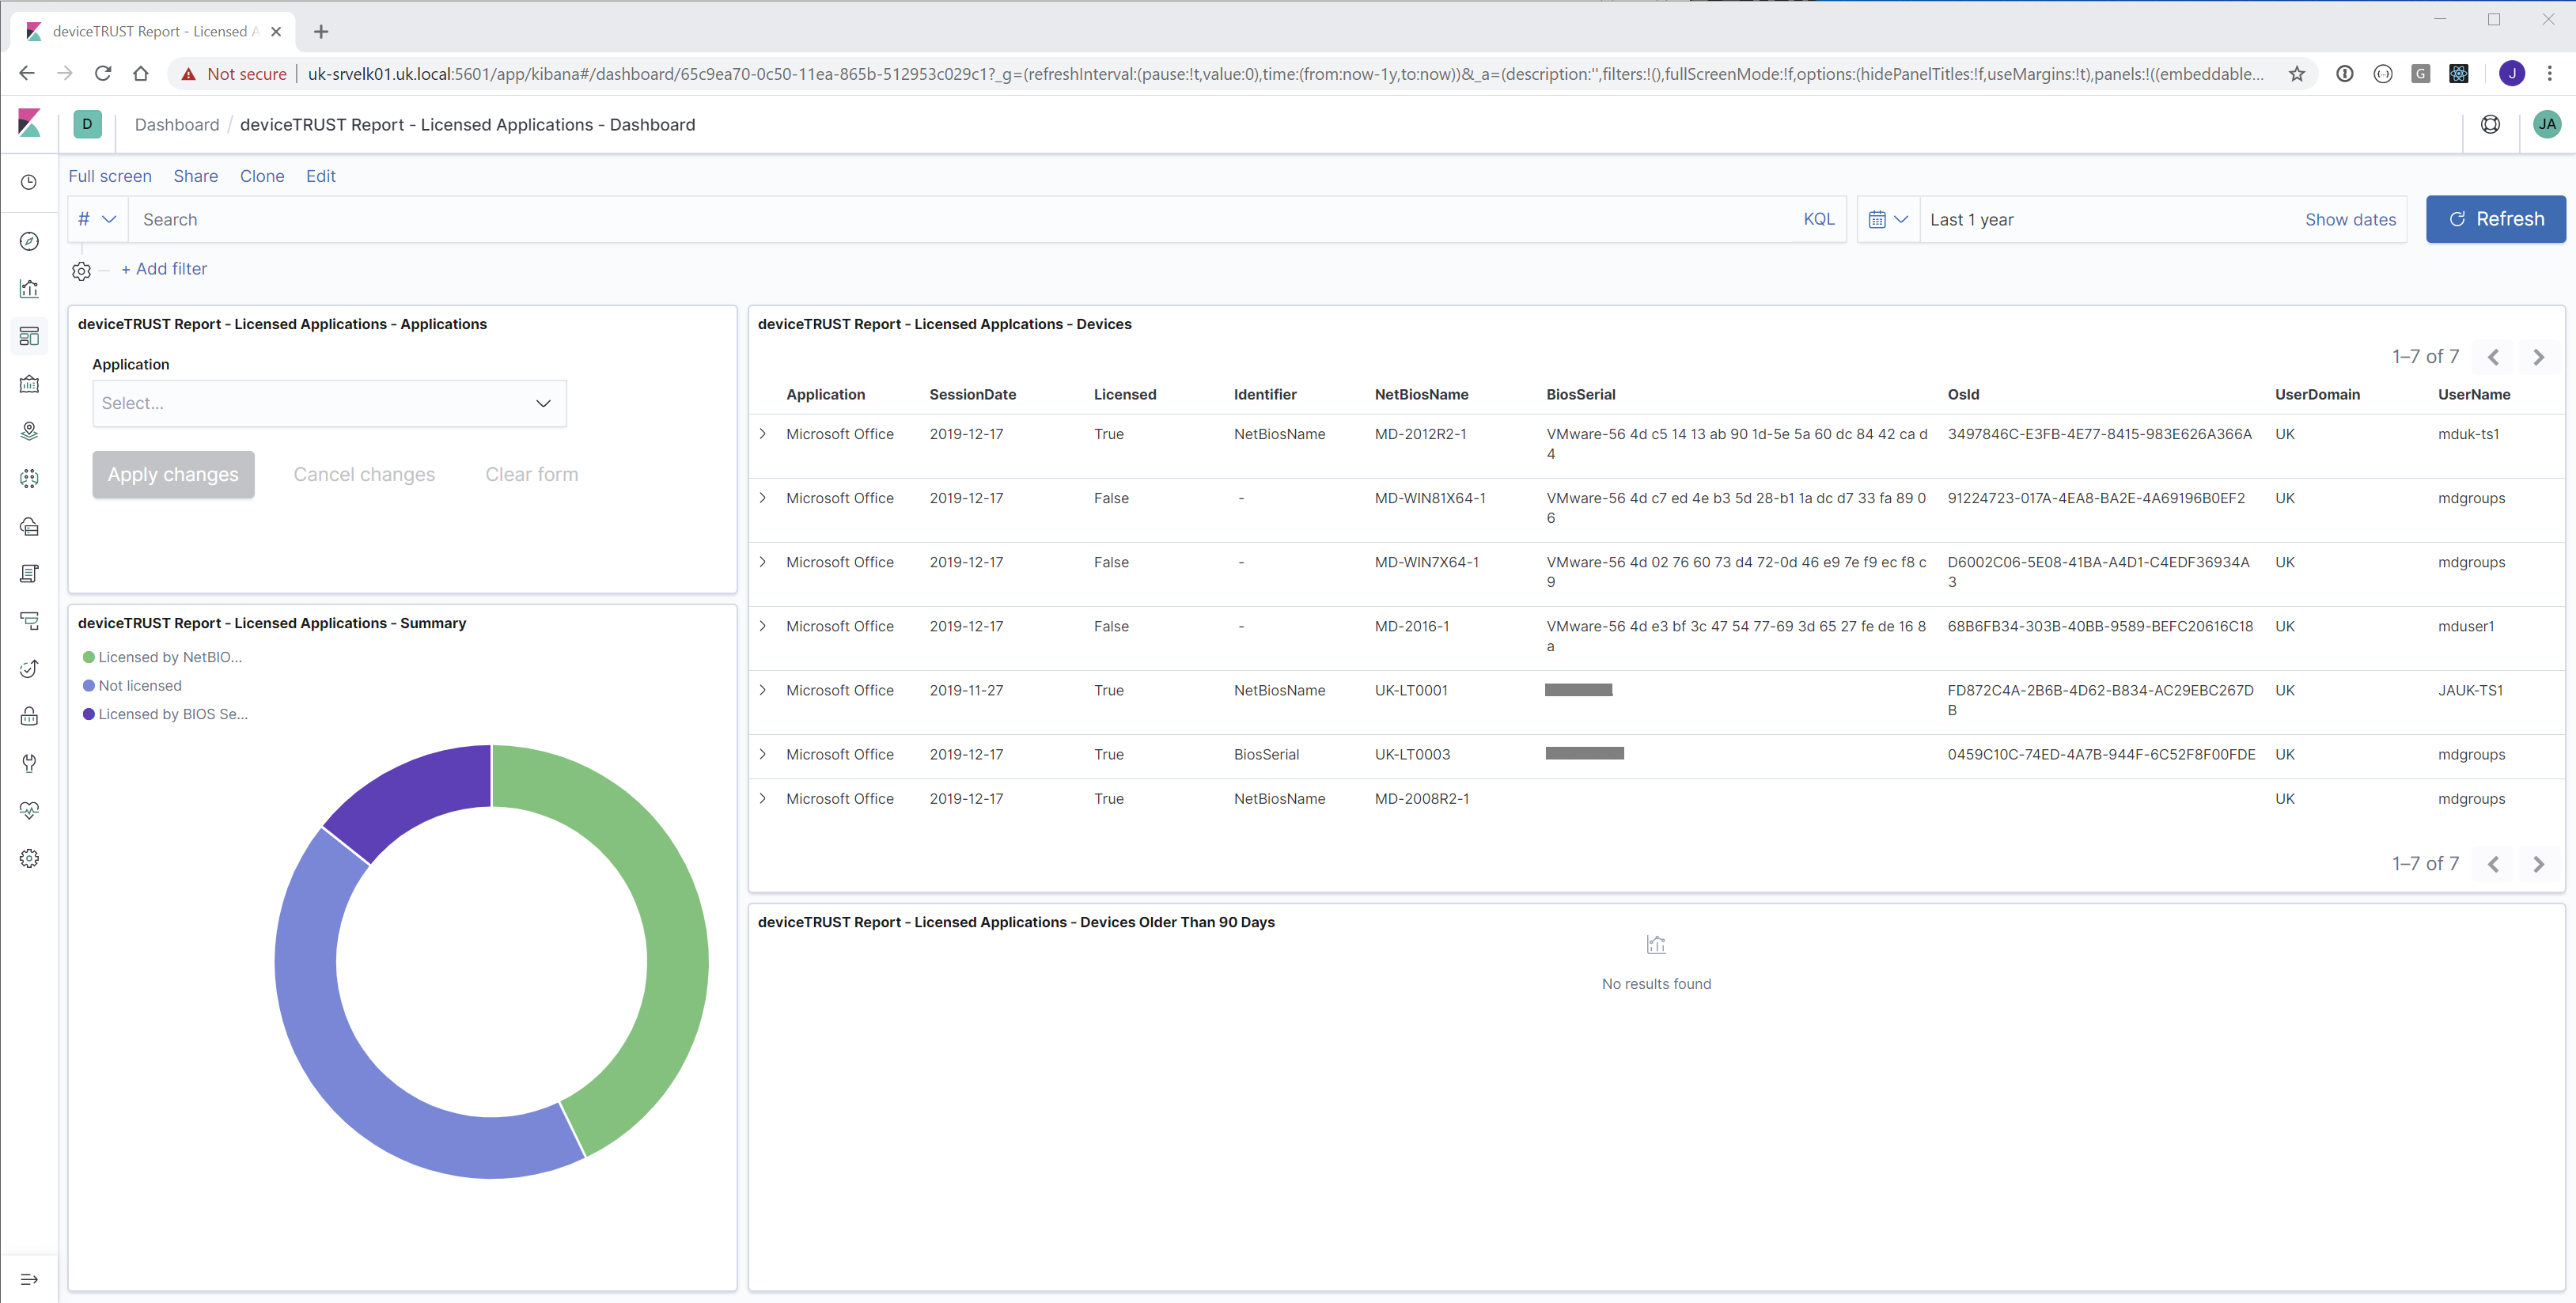
The dashboard pulls together multiple Kibana objects into a single view:
- The deviceTRUST Report - Licensed Applications - Applications visualization lists all licensed applications which have been forwarded by deviceTRUST. Selecting a licensed application from this list filters all views within the dashboard.
- The deviceTRUST Report - Licensed Applications - Summary visualization displays the number of licensed and unlicensed devices, including the metric chosen to license the device.
- The deviceTRUST Report - Licensed Applications - Devices search displays the status of all devices, including whether they are licensed, plus the metric that is used to license them.
- The deviceTRUST Report - Licensed Applications - Devices Older Than 90 Days search displays all devices which have not used their licenses within the past 90 days.