
Getting Started for Fat Client
deviceTRUST requires some simple but essential configuration steps to be performed to enable deviceTRUST functionality for your local devices. We will guide you step-by-step through simple deviceTRUST installation and configuration steps to enable deviceTRUST with an unauthorized USB drives template for your local devices.
We will perform the following steps:
- Step 1: Download the deviceTRUST setup binaries
- Step 2: Install the deviceTRUST Host
- Step 3: Install the deviceTRUST Console
- Step 4: Enter your deviceTRUST License
- Step 5: Import the Unauthorized USB Drives template
Step 1: Download the deviceTRUST setup binaries
The latest deviceTRUST software can be found on our Download page and your personalized license can be found within your product license certificate.
Step 2: Install the deviceTRUST Host
Start the installation of the deviceTRUST Host on your local device. Follow the steps in the section Installing the Host to complete the installation.
Step 3: Install the deviceTRUST Console
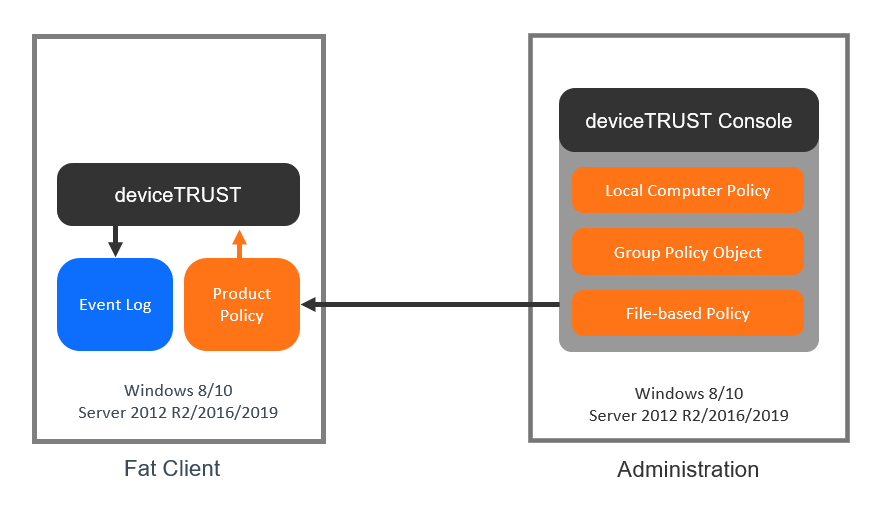
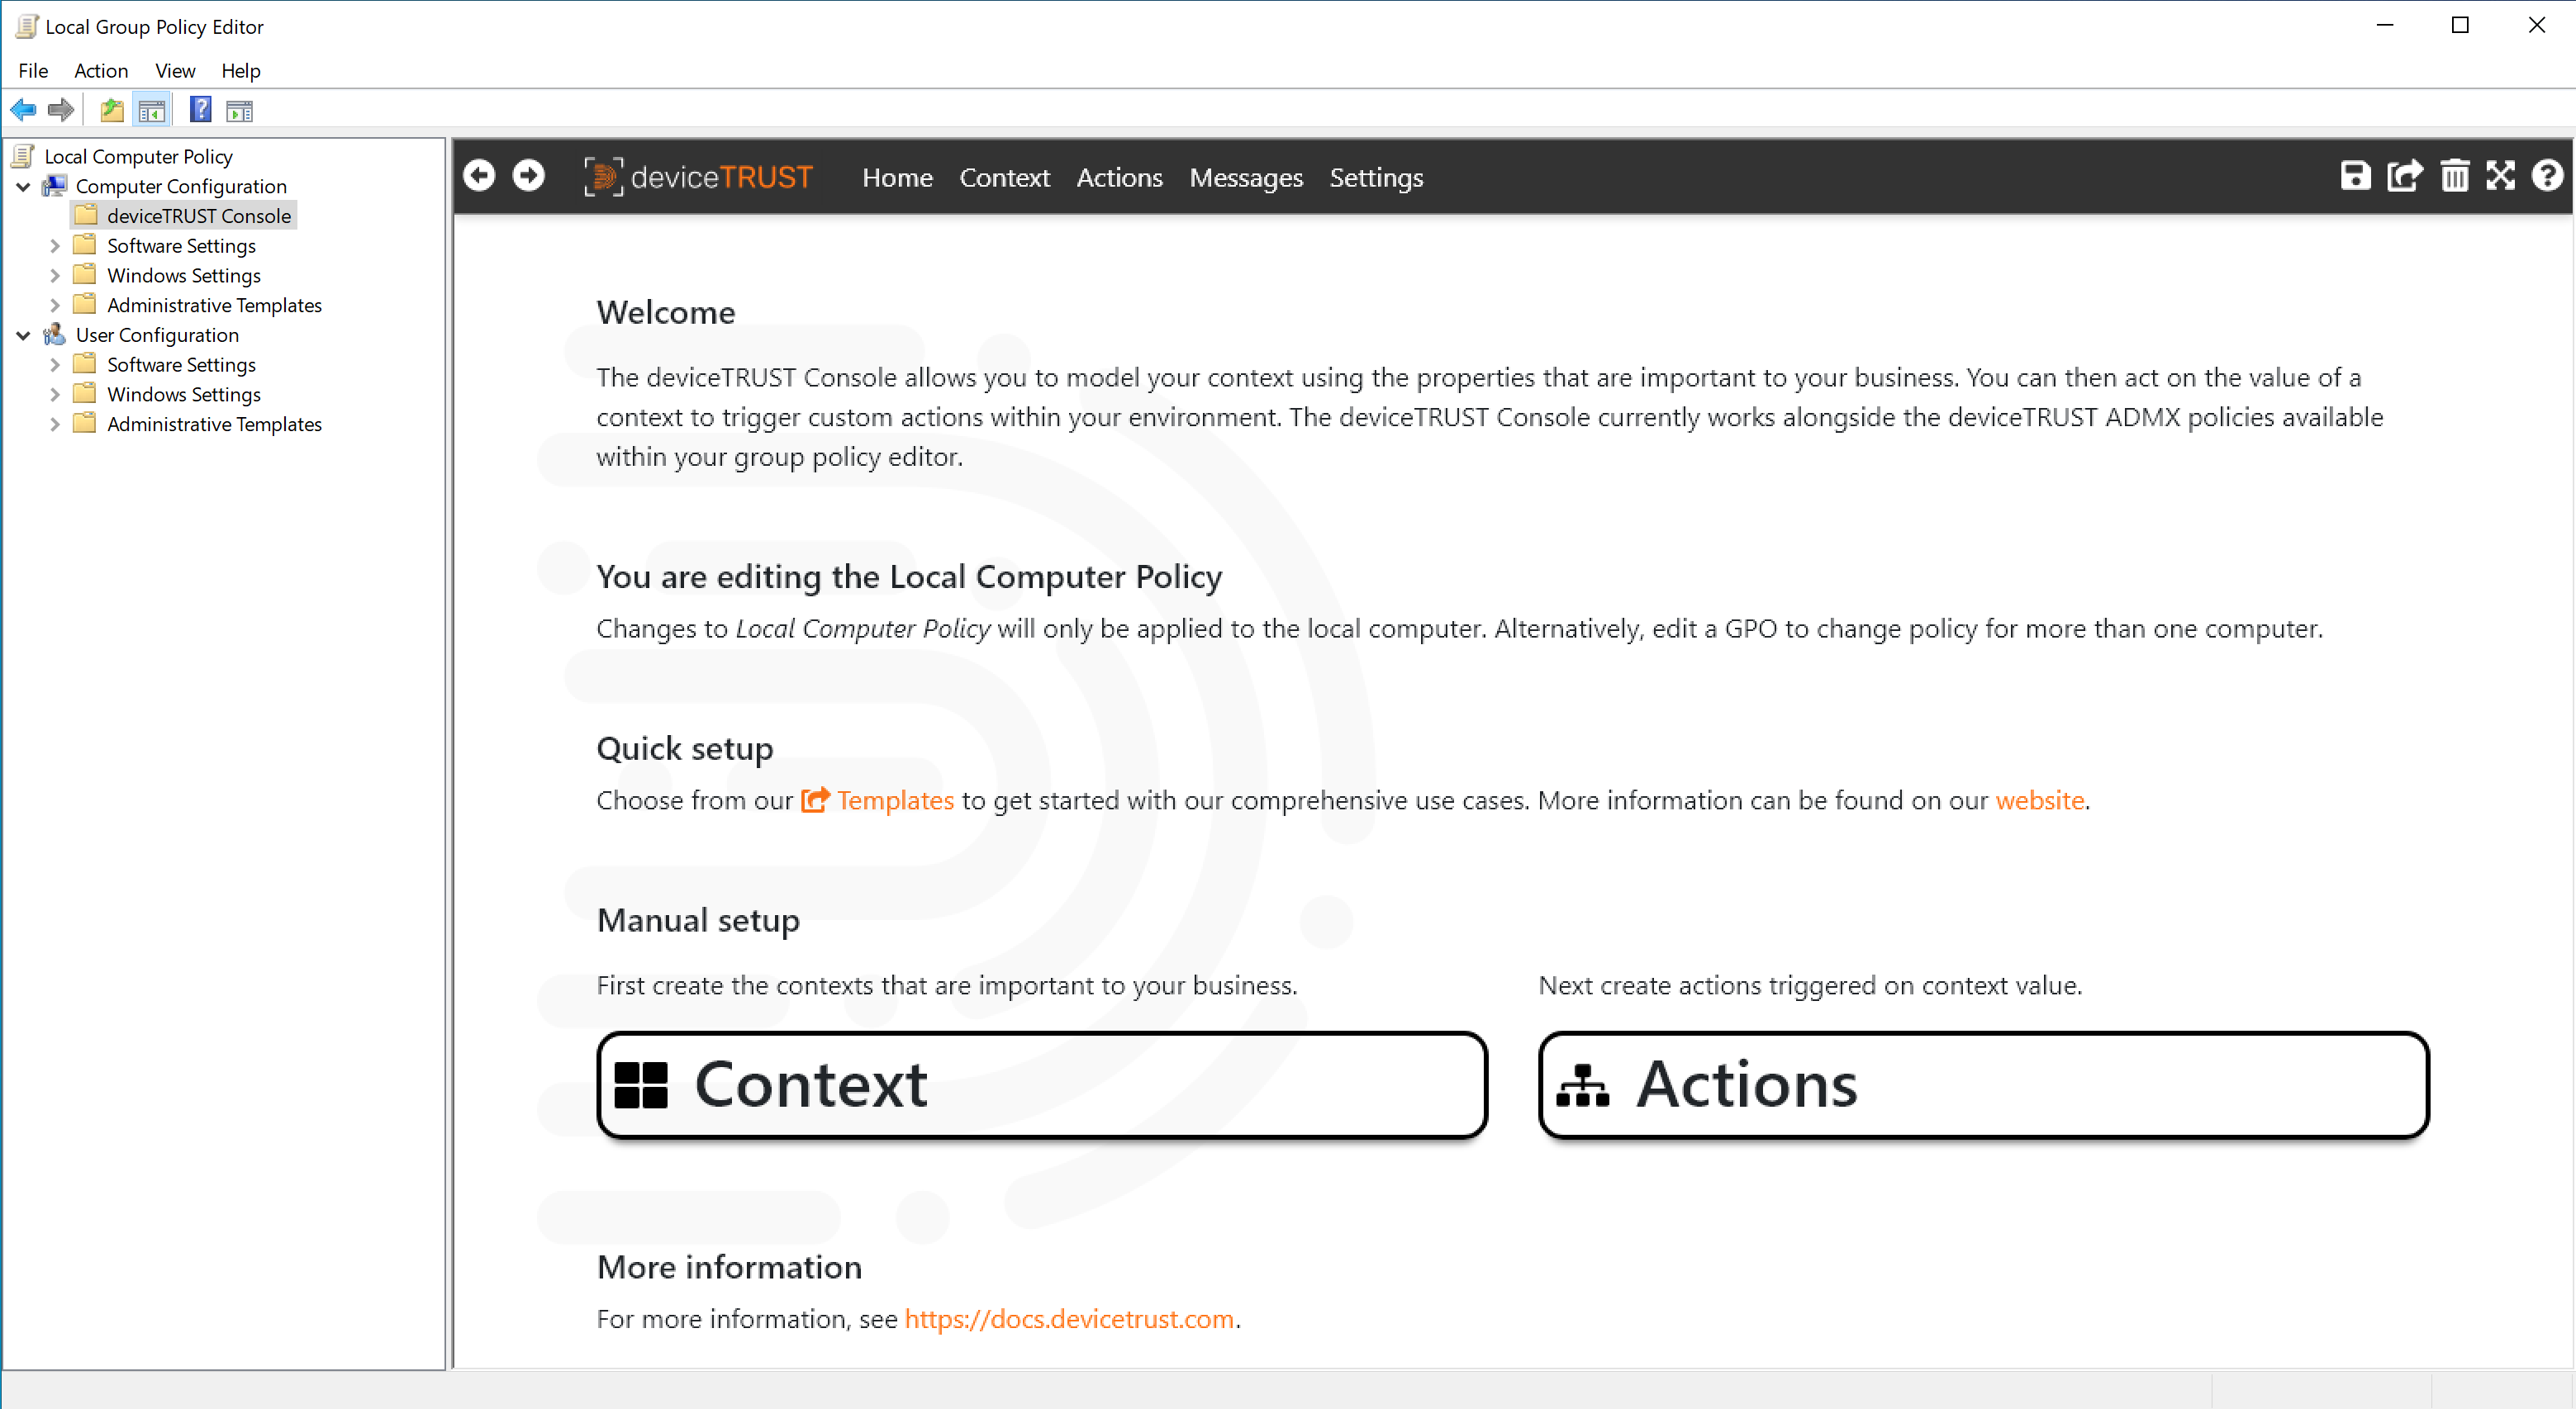
To configure and to apply contextual security policies to the deviceTRUST Host you need to use the deviceTRUST Console. The deviceTRUST Console supports various ways to provide the contextual security policies to the deviceTRUST Host. Those options are using the Local Policy Editor, a Group Policy Object (GPO) or file-based.
Within the Getting Started Guide, for simplicity, we use the Local Policy Editor to quickly and efficiently create, edit, and use contextual security policies. Follow the steps in the section Installing the Console to complete the installation.
The deviceTRUST Console includes a node within the Local Policy Editor COMPUTER CONFIGURATION\DEVICETRUST CONSOLE which can be used to model the context of a user, and then act on changes to that context by triggering custom actions within your environment.
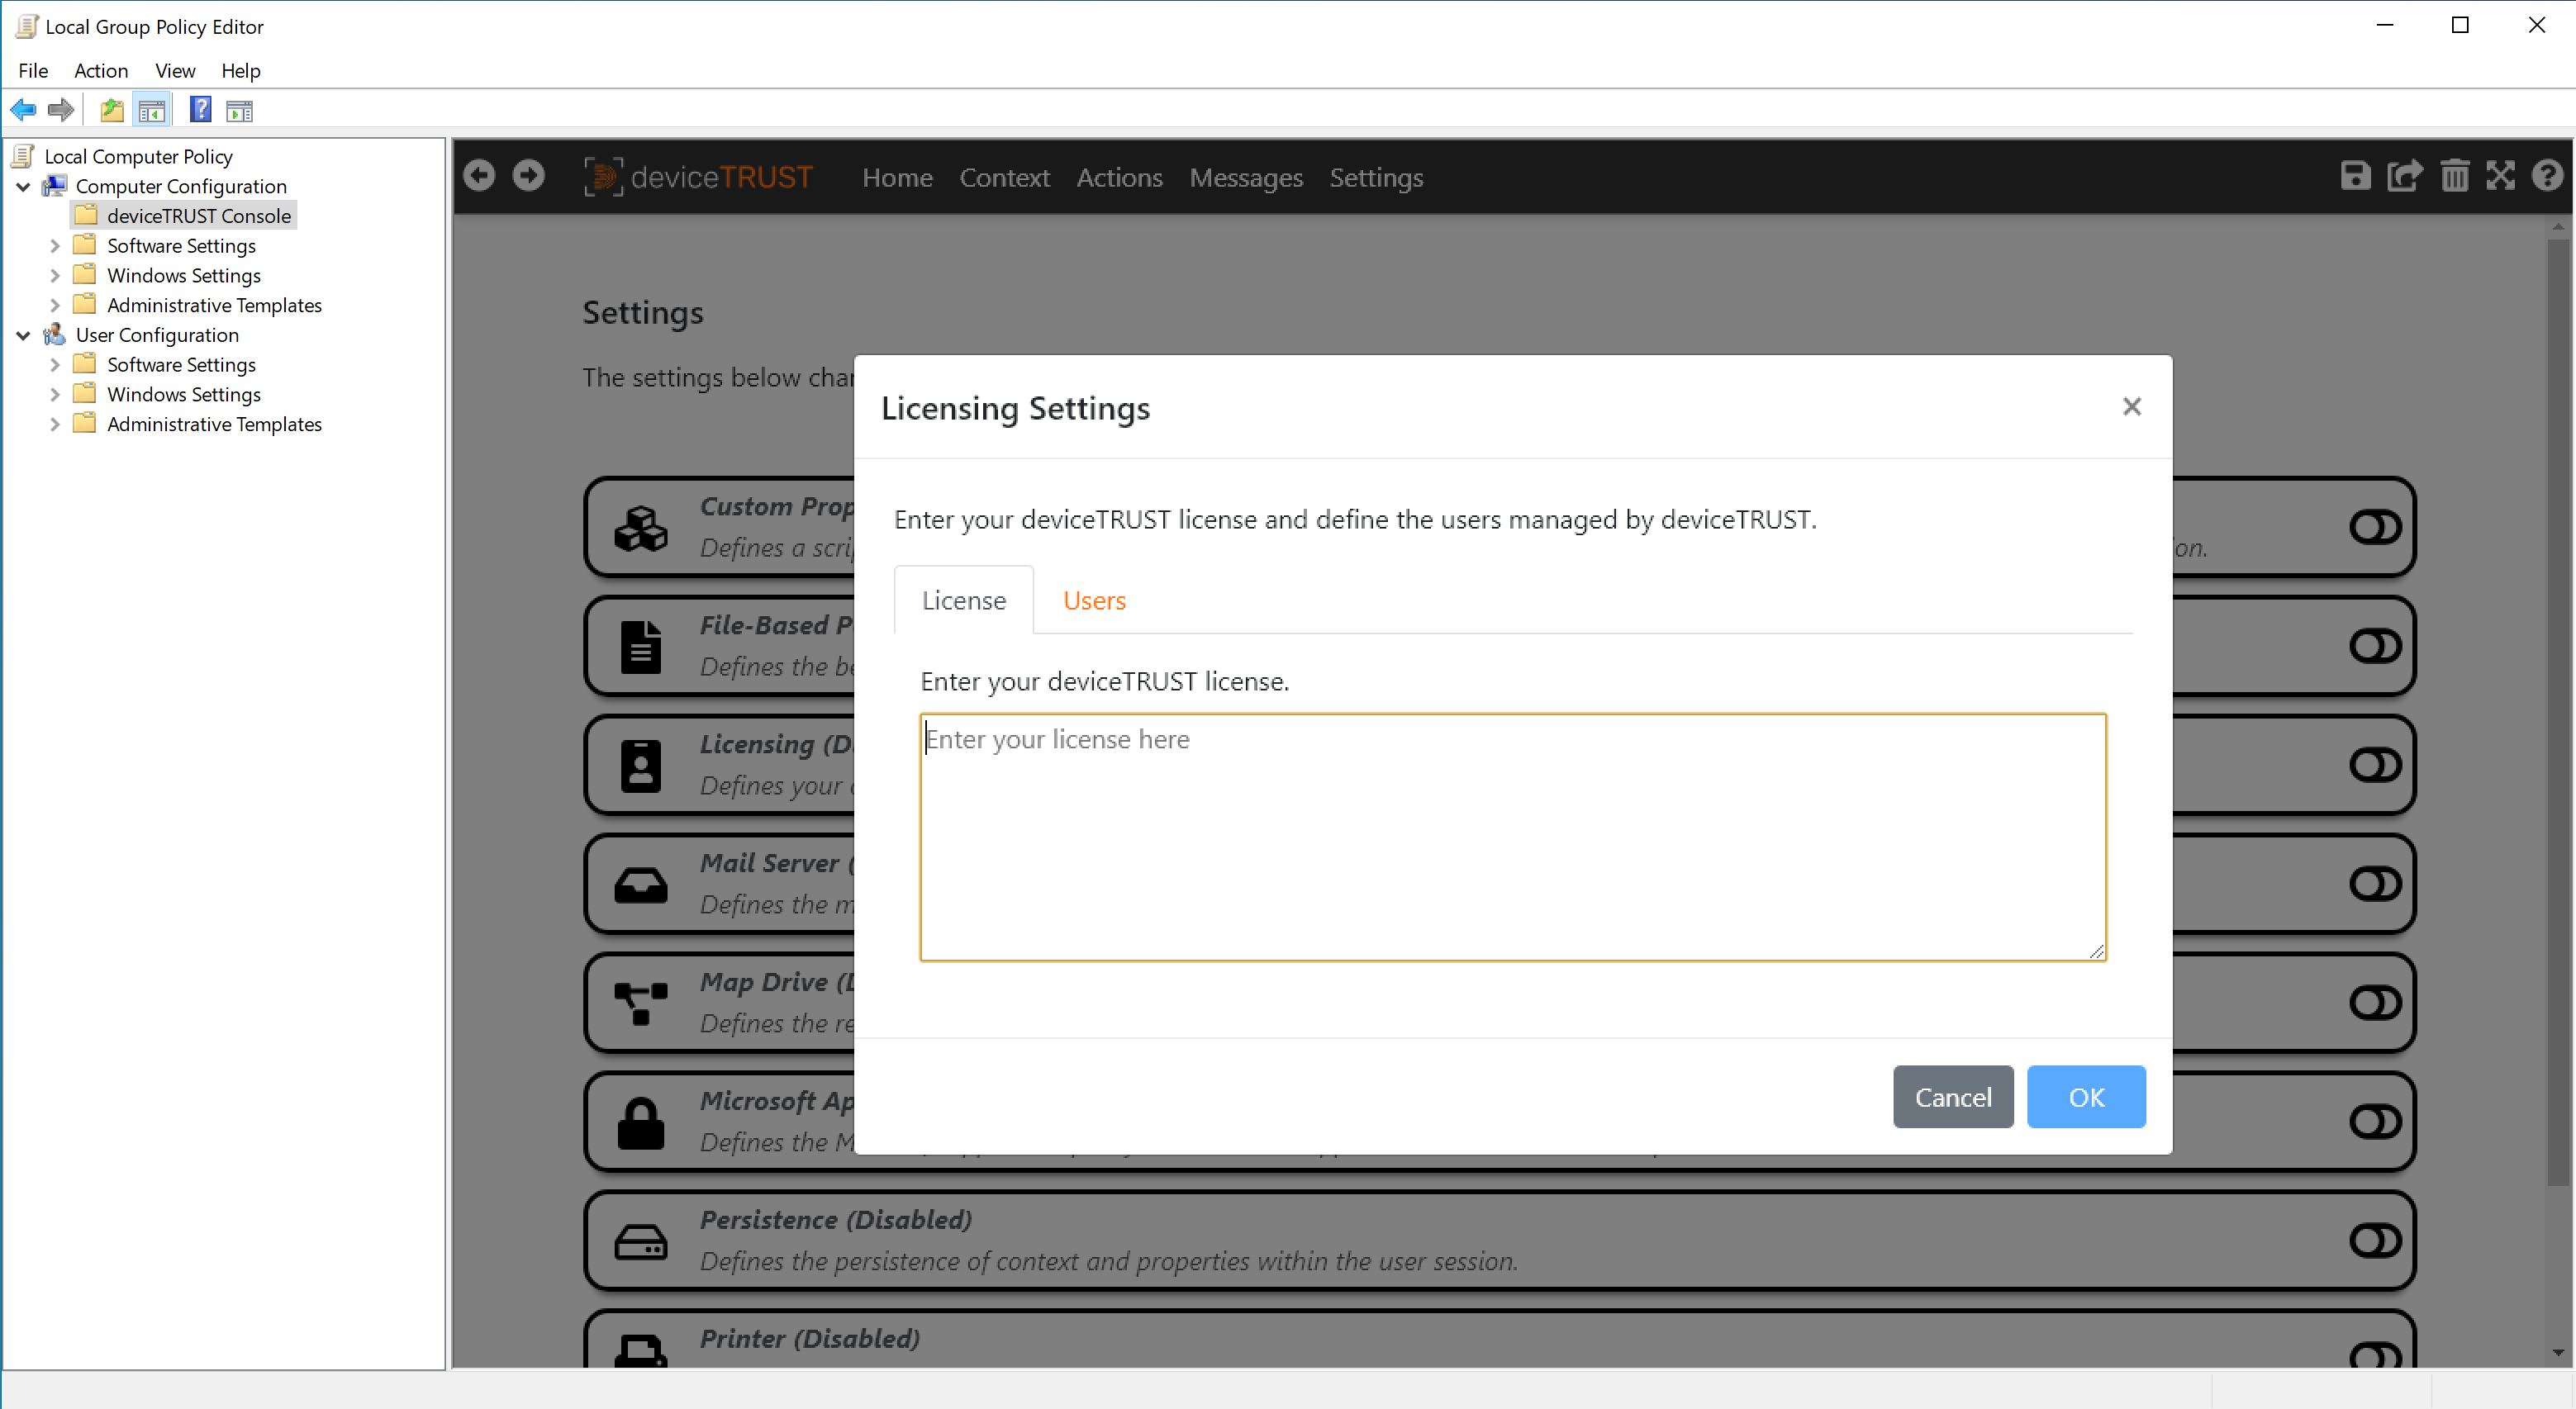
Step 4: Enter your deviceTRUST License
To add the license into the deviceTRUST contextual security policy open the Local Policy Editor and navigate to DEVICETRUST CONSOLE and click on the SETTINGS tab. Select LICENSING and enter your deviceTRUST license, before clicking on the OK button and clicking SAVE in the top right toolbar.
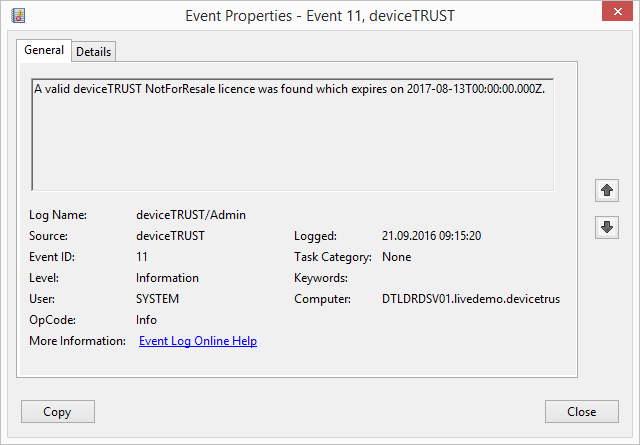
deviceTRUST is now enabled and will work for all users except local administrators connecting to that remoting or DaaS host system with deviceTRUST Host installed. To check if you have added a valid deviceTRUST license, open the Windows Event Log and navigate to APPLICATION AND SERVICE LOGS\DEVICETRUST\ADMIN and check for the existence of event ID 11 which states that your deviceTRUST license is valid.
Step 5: Import the Unauthorized USB Drives template
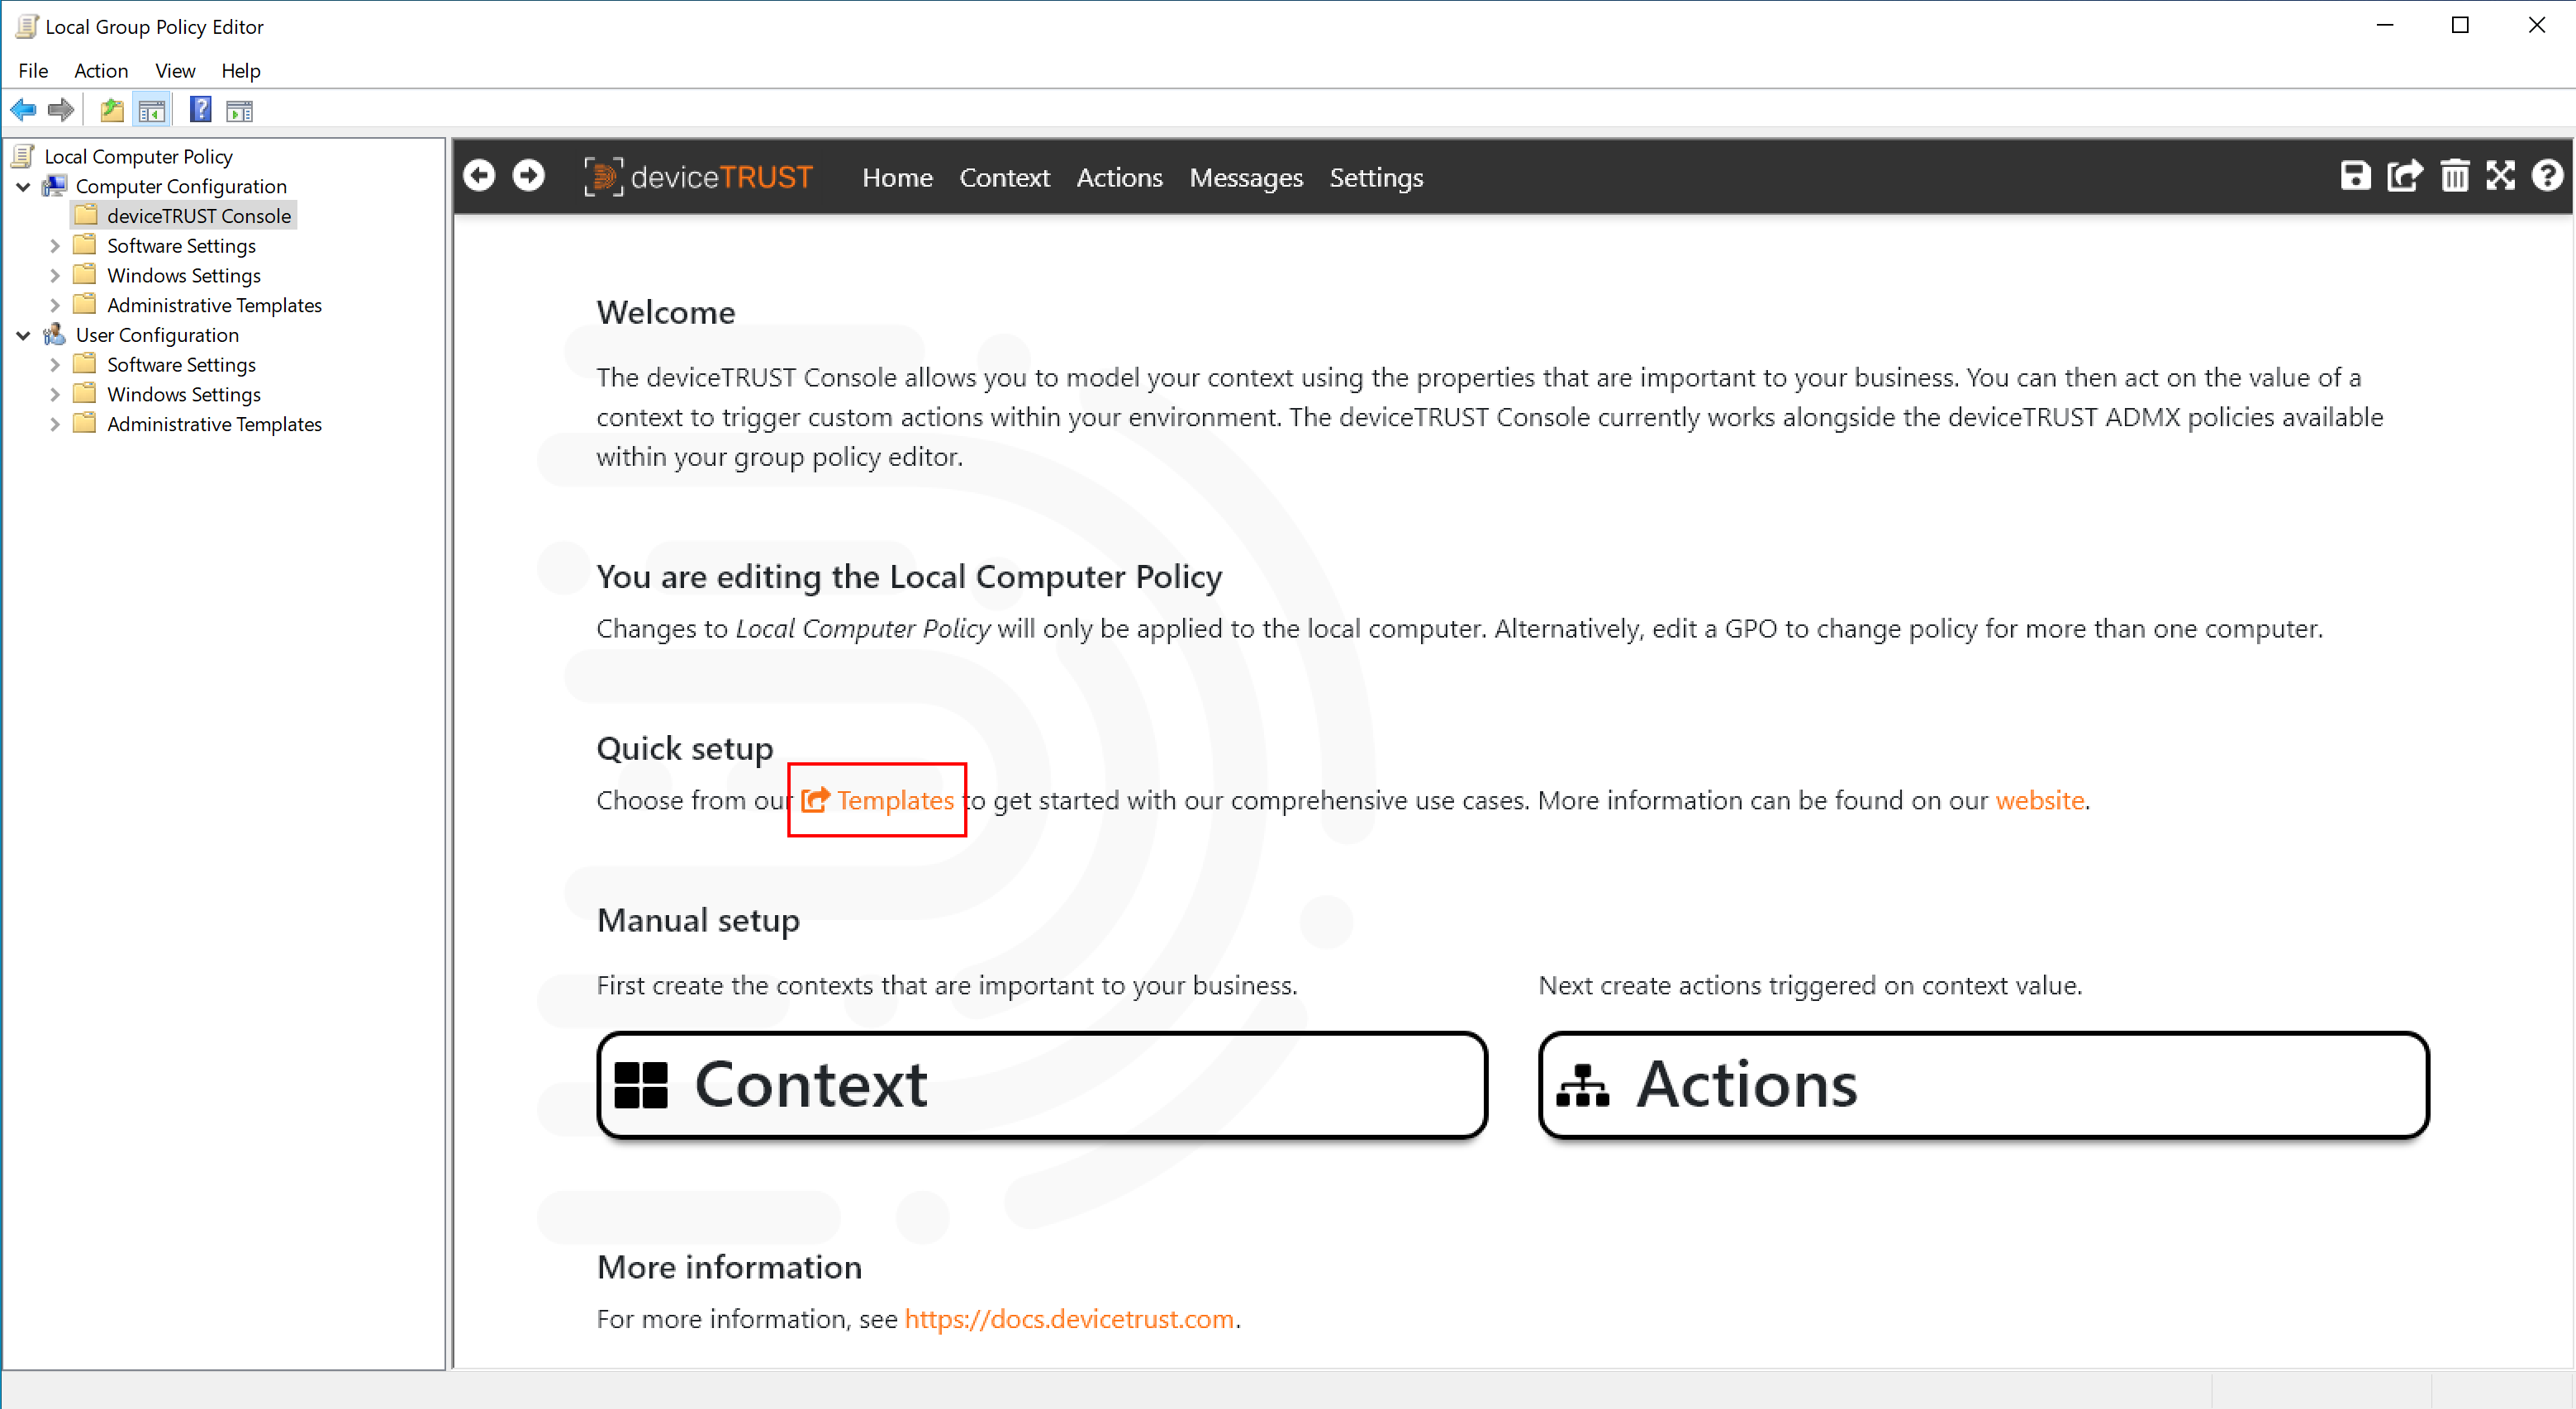
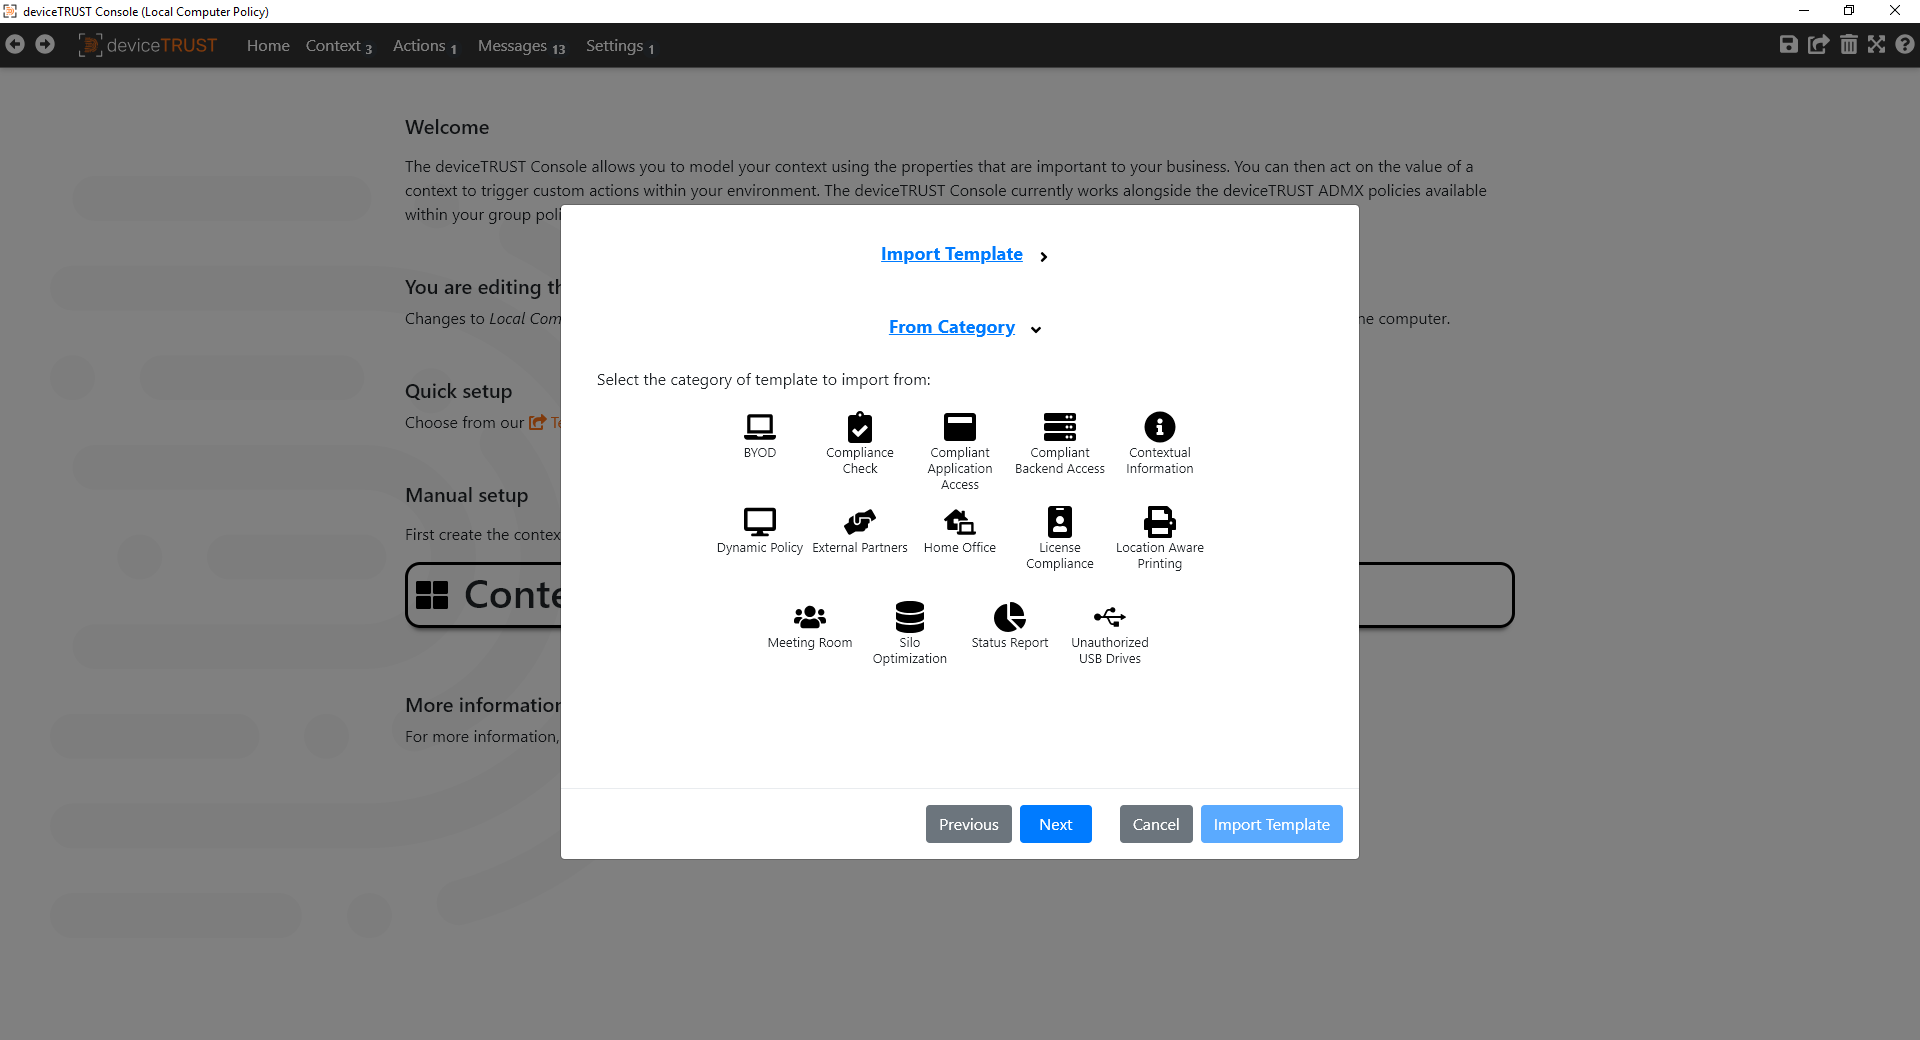
We will use the deviceTRUST console to create a contextual security policy that makes access to the shell dependent on whether the USB drive being used has been authorized. The deviceTRUST Console includes a set of templates which can be used to quickly implement a use case. Launch the deviceTRUST Console and click on the TEMPLATES button on the homepage, or select SHARING in the top right of the navigation bar and then IMPORT FROM TEMPLATE.
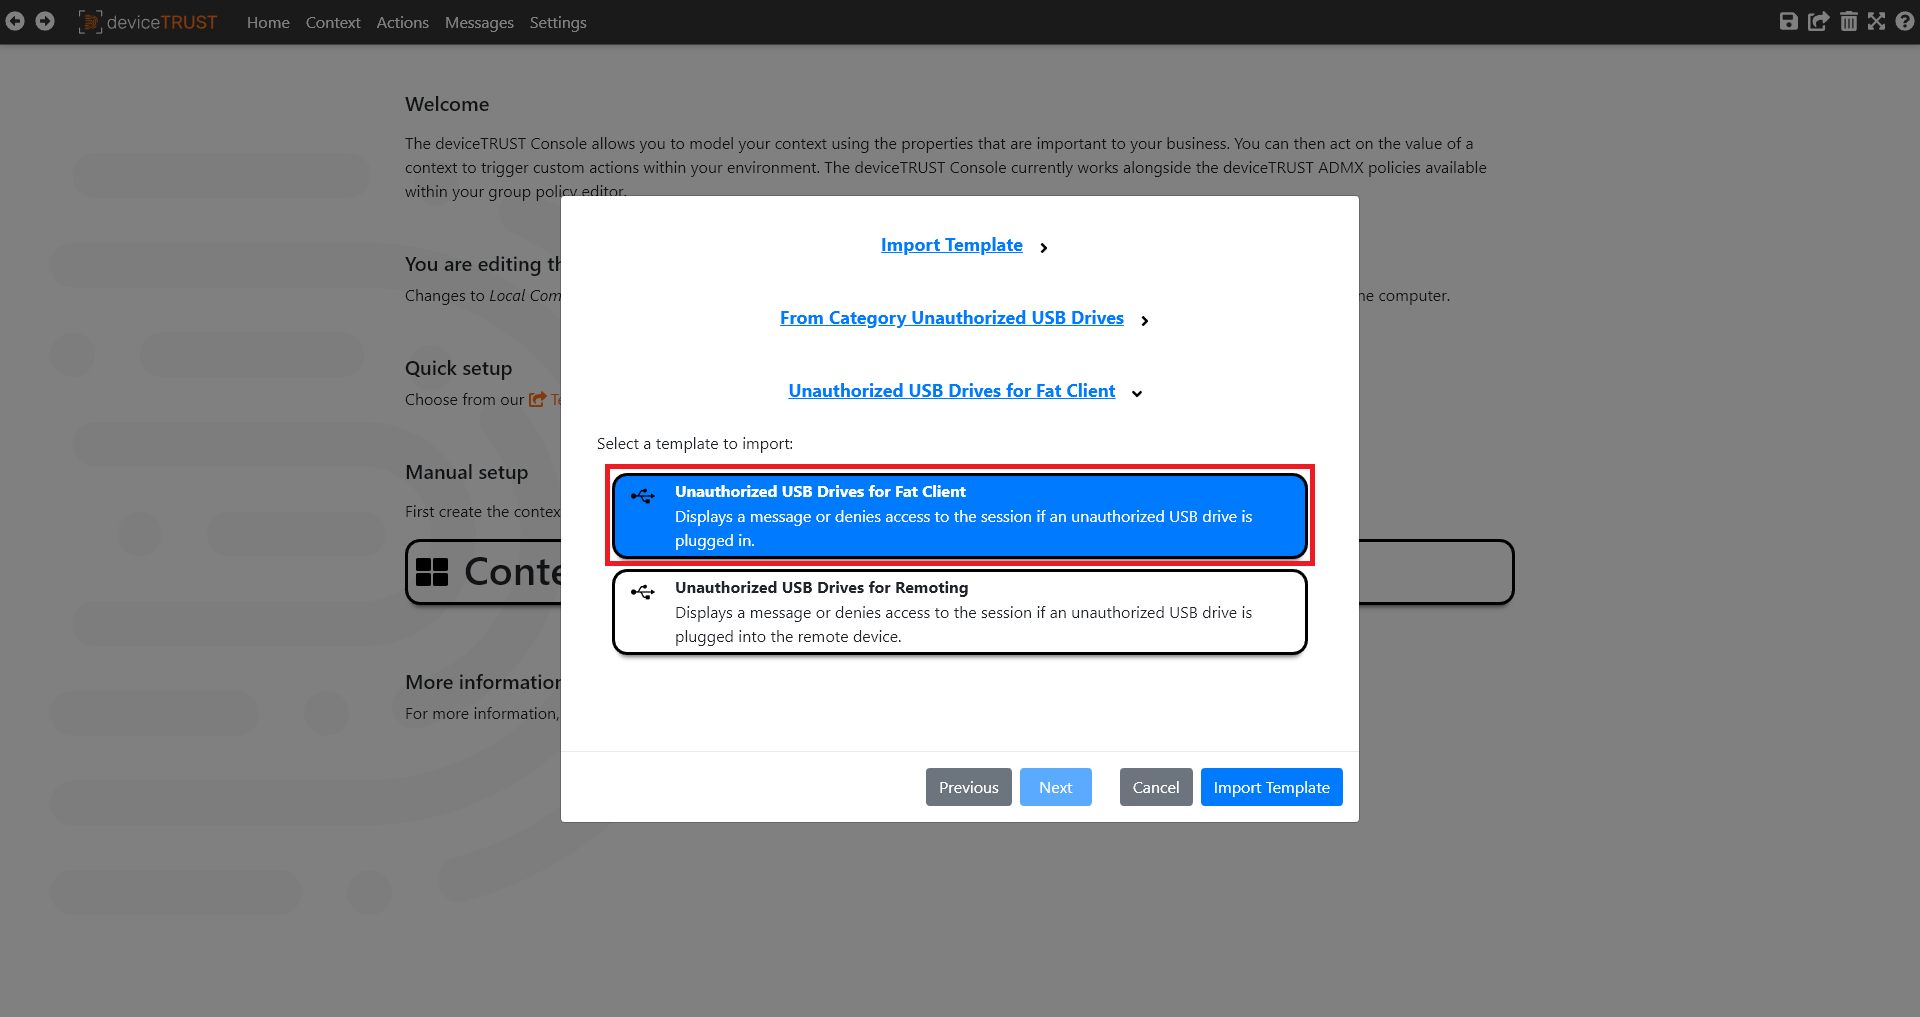
Select the UNAUTHORIZED USB DRIVES template category, click on the UNAUTHORIZED USB DRIVES FOR FAT CLIENT template, choose IMPORT TEMPLATE and finally click OK to dismiss the summary message.
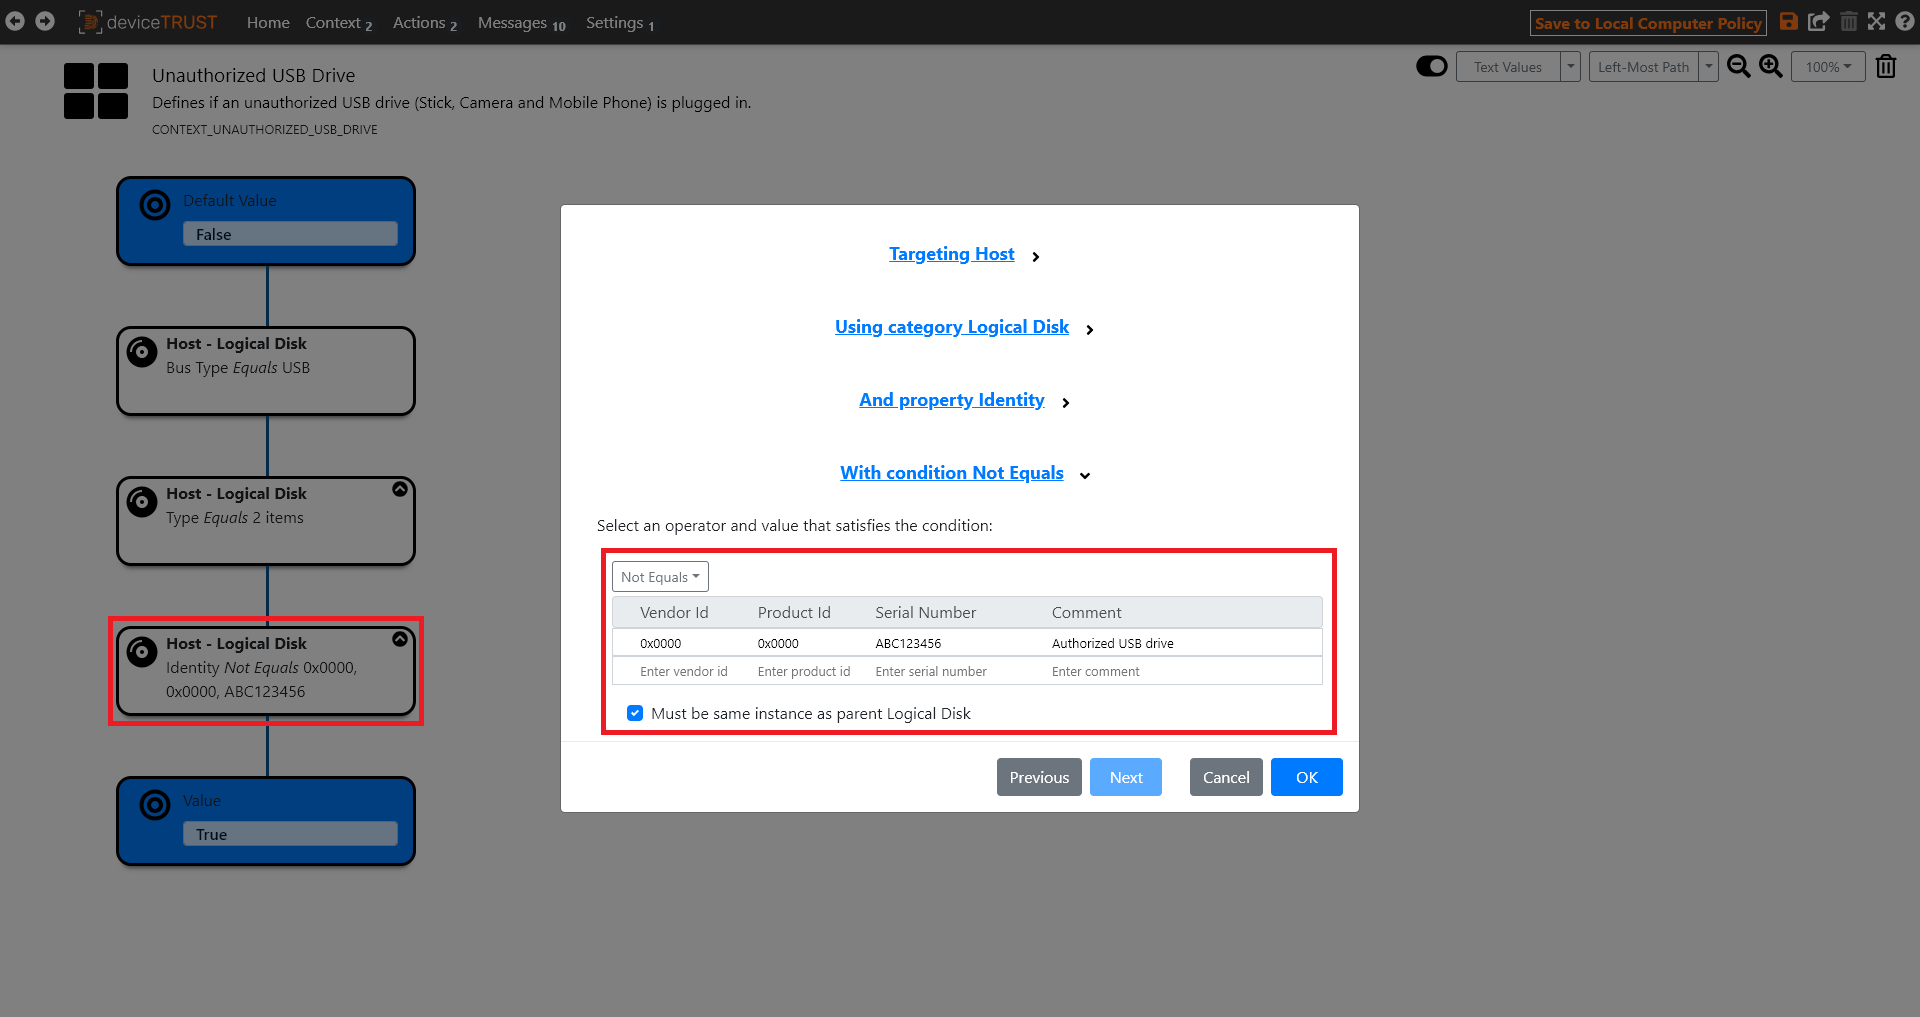
Click on CONTEXT within the navigation bar to view the imported contexts and then select the UNAUTHORIZED USB DRIVE context definition.
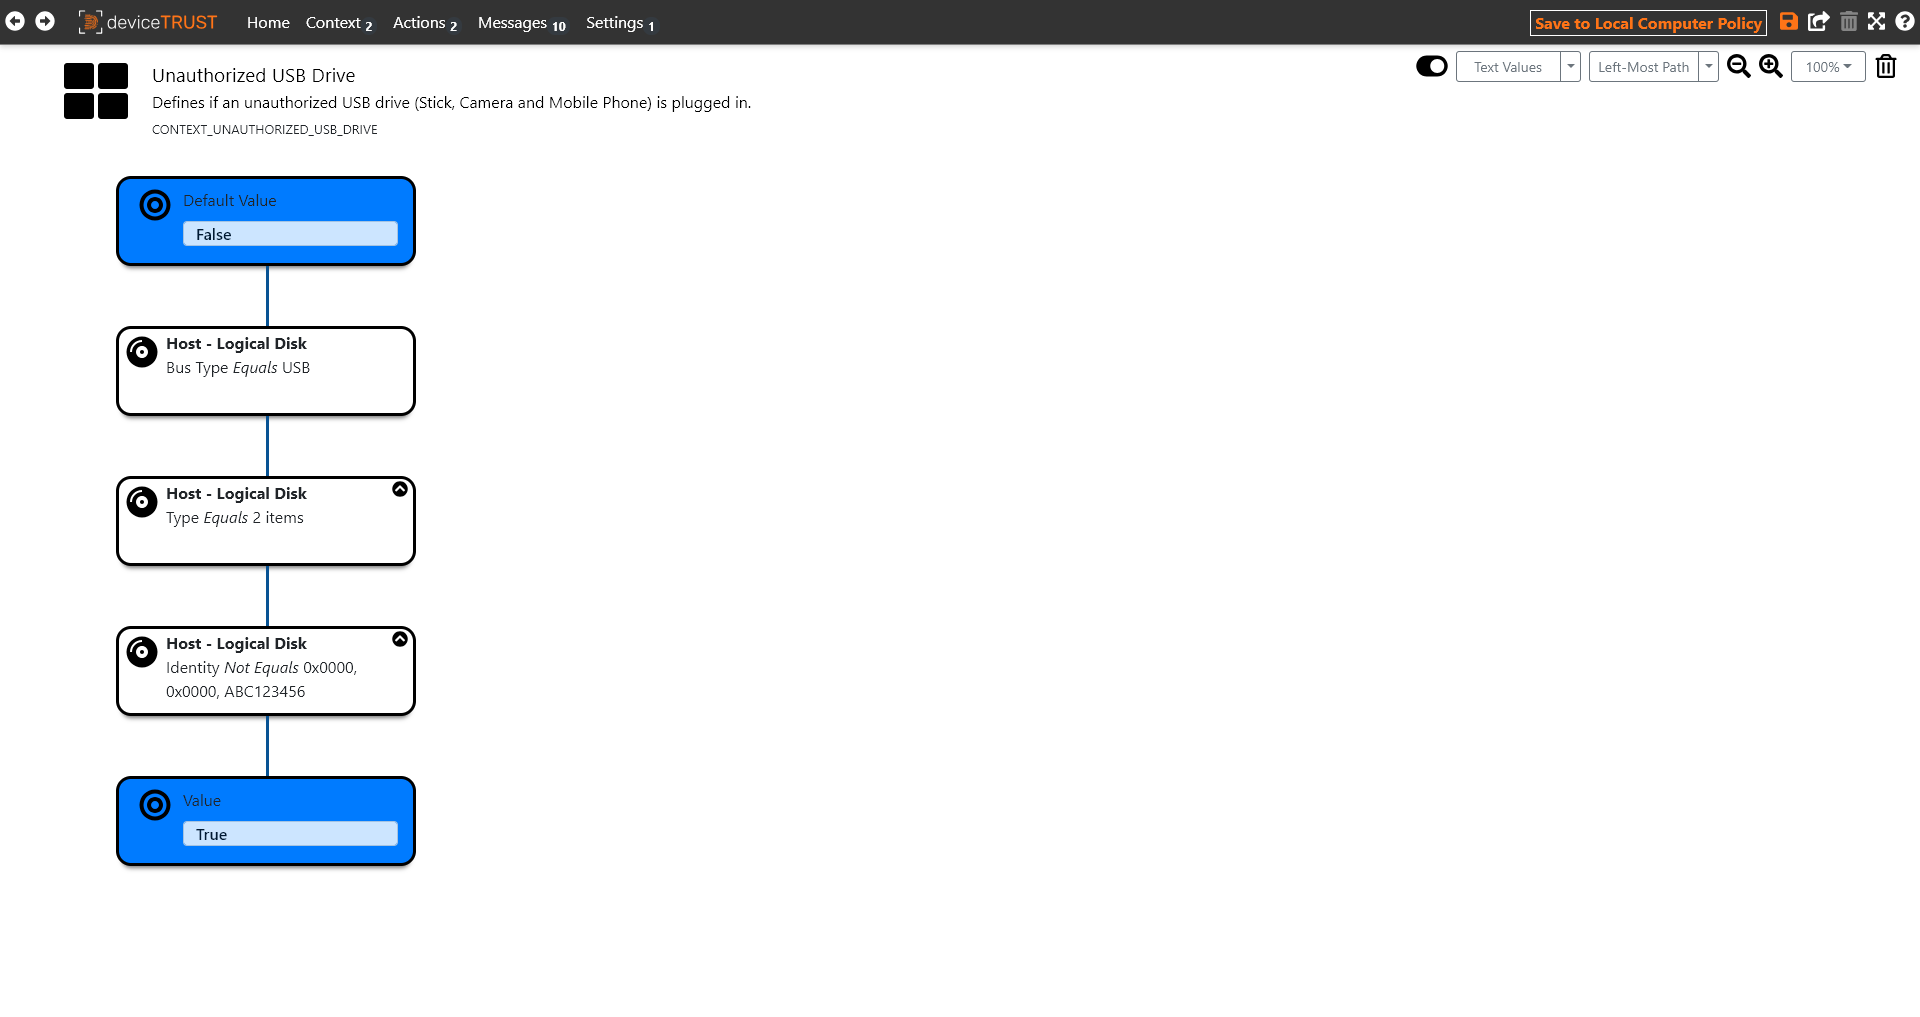
The context is set to the value of the left-most path where all conditions successfully evaluate. If no path is found, then the default value is used. For the UNAUTHORIZED USB DRIVE context, an unauthorized USB drive is detected with TRUE if the identity of the USB drive does not match the authorized USB drives in the list.
One or more authorized USB drives can be added to the list very easily. For this purpose, only the VENDOR ID (VID), PRODUCT ID (PID) and the SERIAL NUMBER of the authorized USB drive must be entered.
Depending on the requirements, it is also sufficient to use only the VENDOR ID (VID) and the PRODUCT ID (PID) to authorize a category of USB drives from one vendor. Any notes can be added via the comment field.
If these conditions are not met then the UNAUTHORIZED USB DRIVE context is set to FALSE.
Click on ACTIONS within the navigation bar to view the imported actions. Most deviceTRUST templates come with an action that notifies the user about a context status and another action that actively controls access to the session or to applications. By default, only the notifying action is enabled and the active action is disabled.
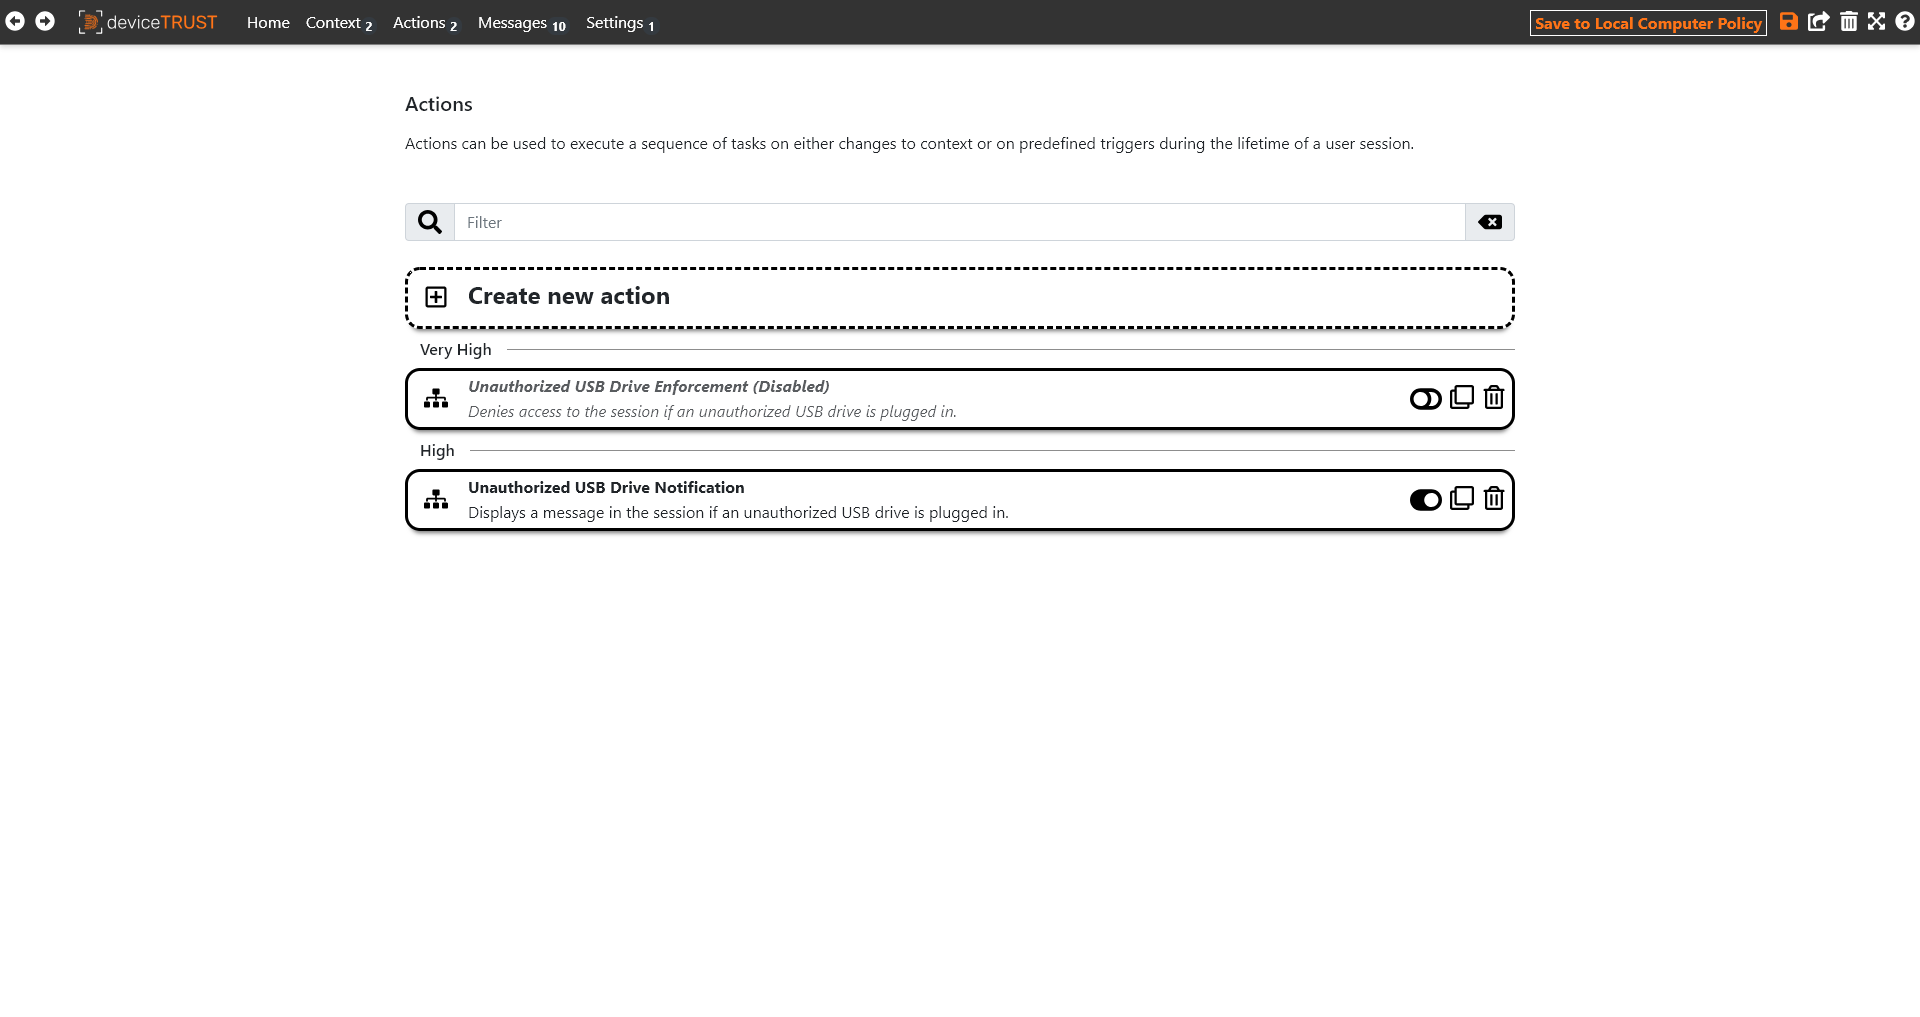
For the next step, we disable the UNAUTHORIZED USB DRIVE NOTIFICATION action and enable the UNAUTHORIZED USB DRIVE ENFORCEMENT action to actively respond to the security state context. The respective action can be switched on or off accordingly via the action overview page or within the action definition.
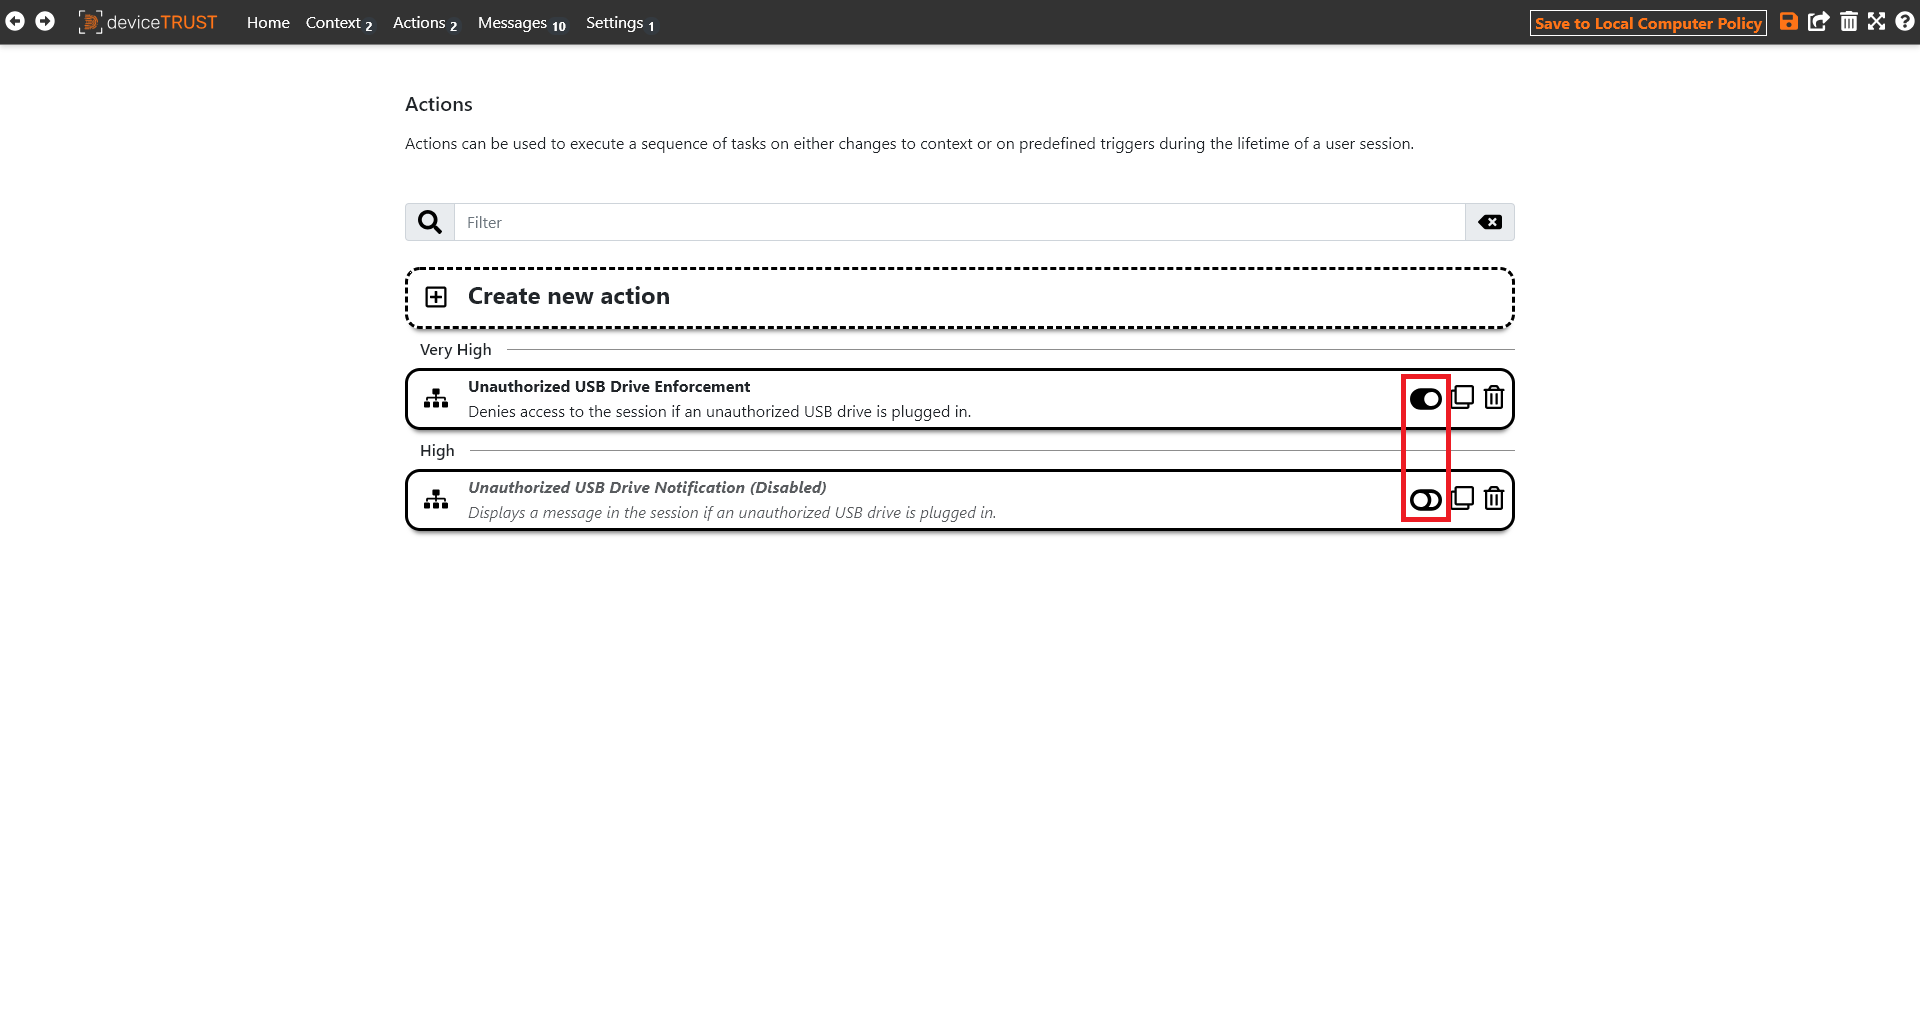
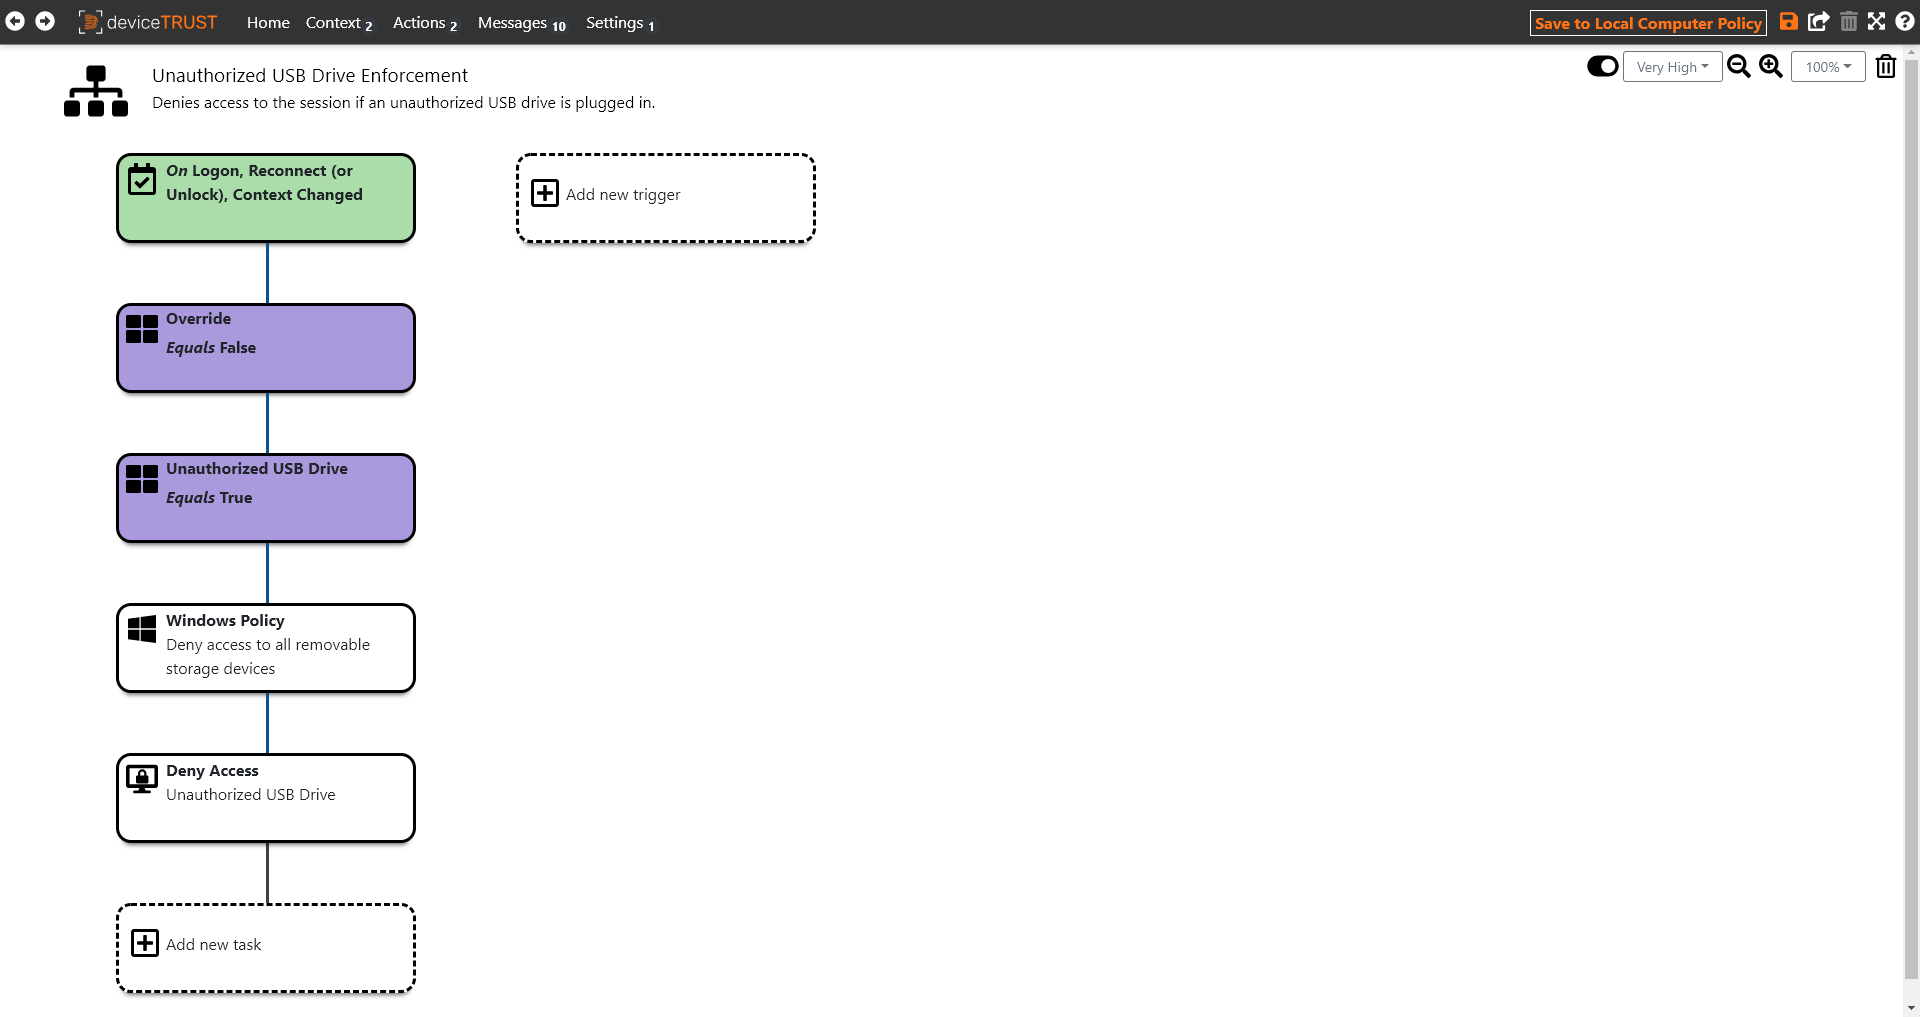
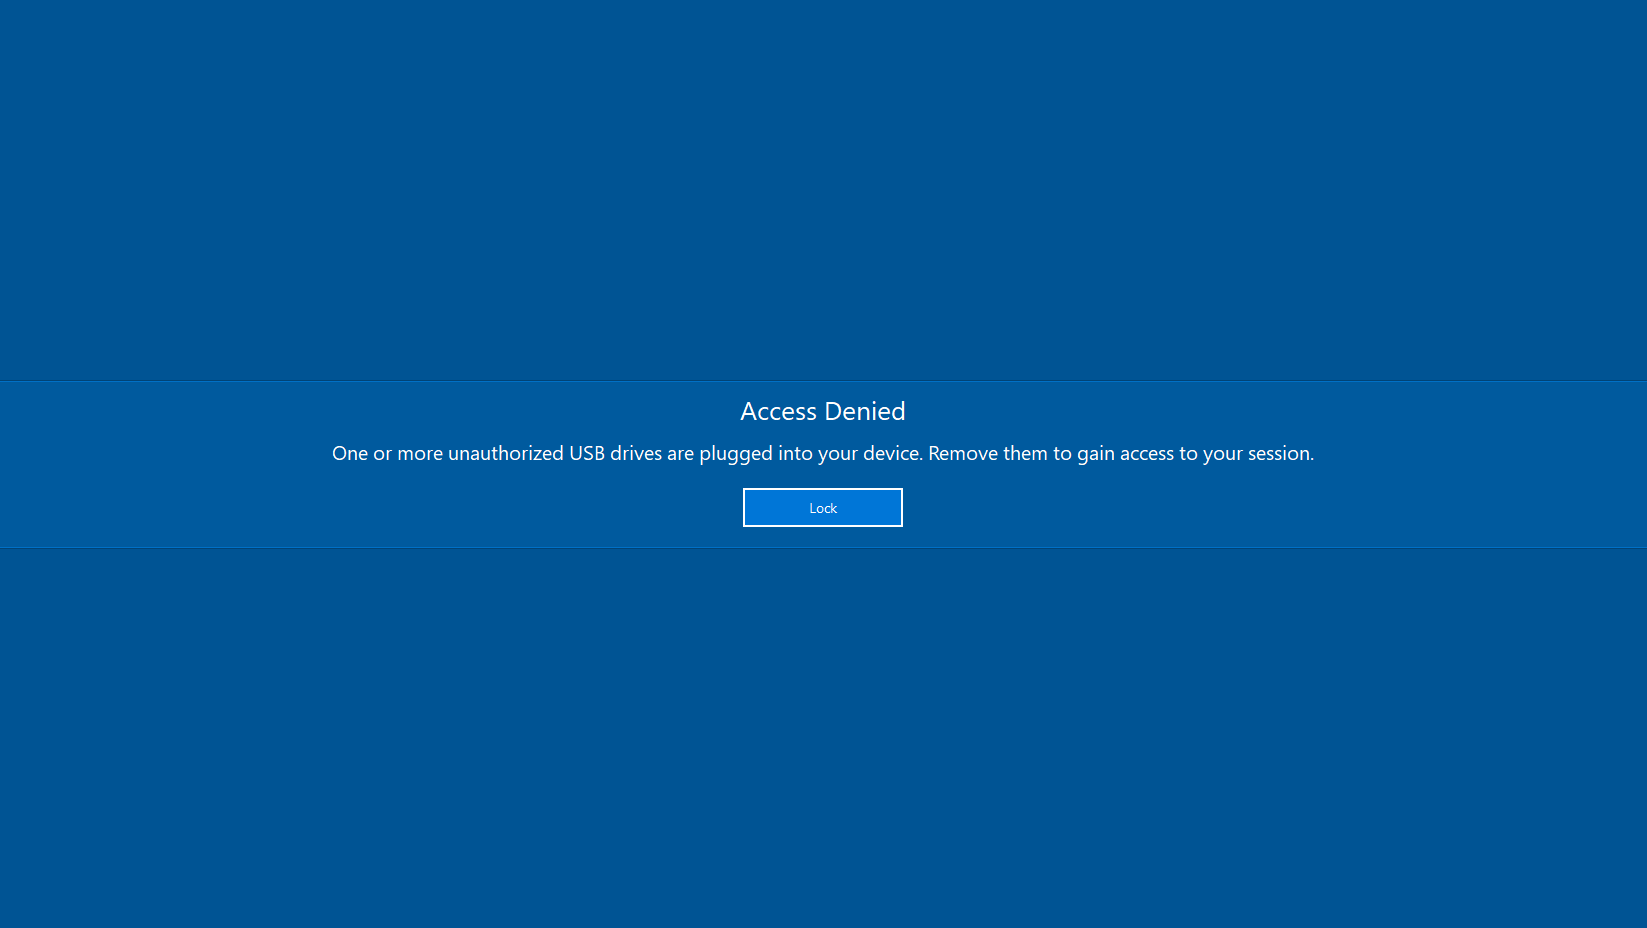
Actions execute a sequence of tasks when a trigger occurs, such as LOGON, RECONNECT, CONTEXT CHANGE etc, and optionally filtered by the value of a context. For the UNAUTHORIZED USB DRIVE ENFORCEMENT action, whenever the UNAUTHORIZED USB DRIVE becomes TRUE, access to the shell will be denied with an appropriate text.
Click on the SAVE icon which will be highlighted within the navigation bar.
Step 6: Test the Unauthorized USB Drive template
Sign in with a non-administrative user account to the local device and then plug in an authorized USB drive at runtime. The authorized USB drive is displayed in Windows Explorer and can be used. Now plug in an unauthorized USB drive in addition or exclusively to see how deviceTRUST can easily and dynamically control access to the shell depending on the USB drives in use.
Next steps
You have now successfully implemented your first use case with deviceTRUST for your local devices. Feel free to check out our additional use cases that come as templates with the deviceTRUST Console:
Troubleshooting
If your deviceTRUST installation or configuration does not work as expected, you can use the Troubleshooting for Fat Clients guide to start troubleshooting.